
How to Build Your First Affiliate Funnel Using Systeme.io (Step-by-Step Guide for Beginners)
How to Build Your First Affiliate Funnel Using Systeme.io (Step-by-Step Guide for Beginners)
When I first started in this online affiliate marketing world and heard the word “funnel,” I honestly had no idea what it meant. It sounded very technical, overwhelming, and way beyond where I was starting from.
But once I actually saw what a basic affiliate funnel for beginners looked like, I had a bit of an “aha” moment… It wasn’t complex at all. It was just a clean, logical path that gives value upfront and then makes an offer.
This guide will walk you through how to build your first affiliate funnel from start to finish. No fluff and no crazy tech skills are needed.
By the end, you’ll have a live funnel that collects leads and points people to your affiliate offer.
I put a lot into this guide, so I hope you get a lot out of it.
Let’s get into it.
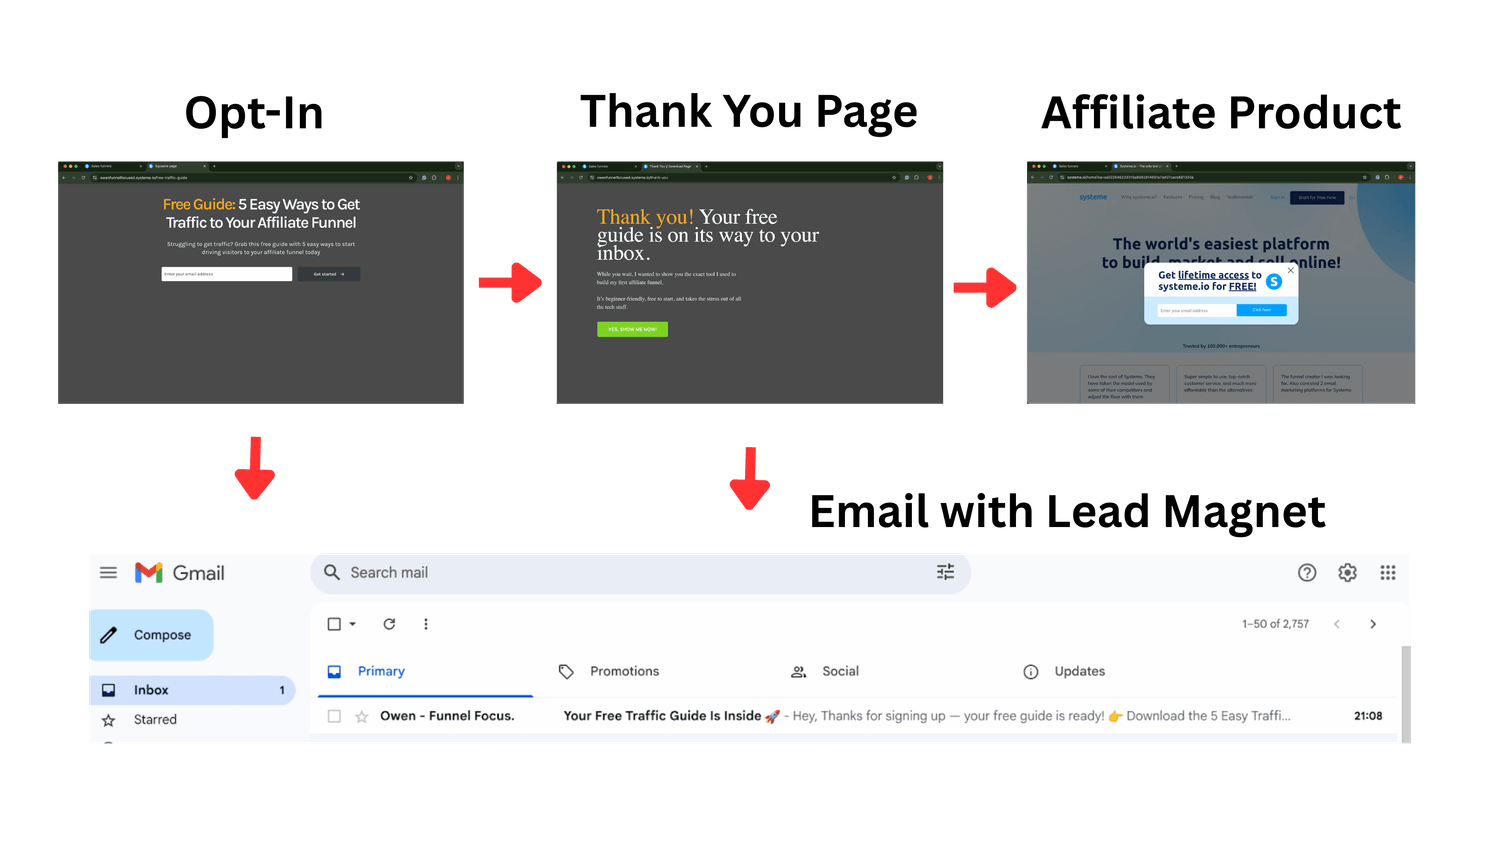
What a Basic Affiliate Funnel for Beginners Looks Like
Ok, so before we get into the nitty-gritty of it, you need to understand what each part of a funnel is and what it actually does.
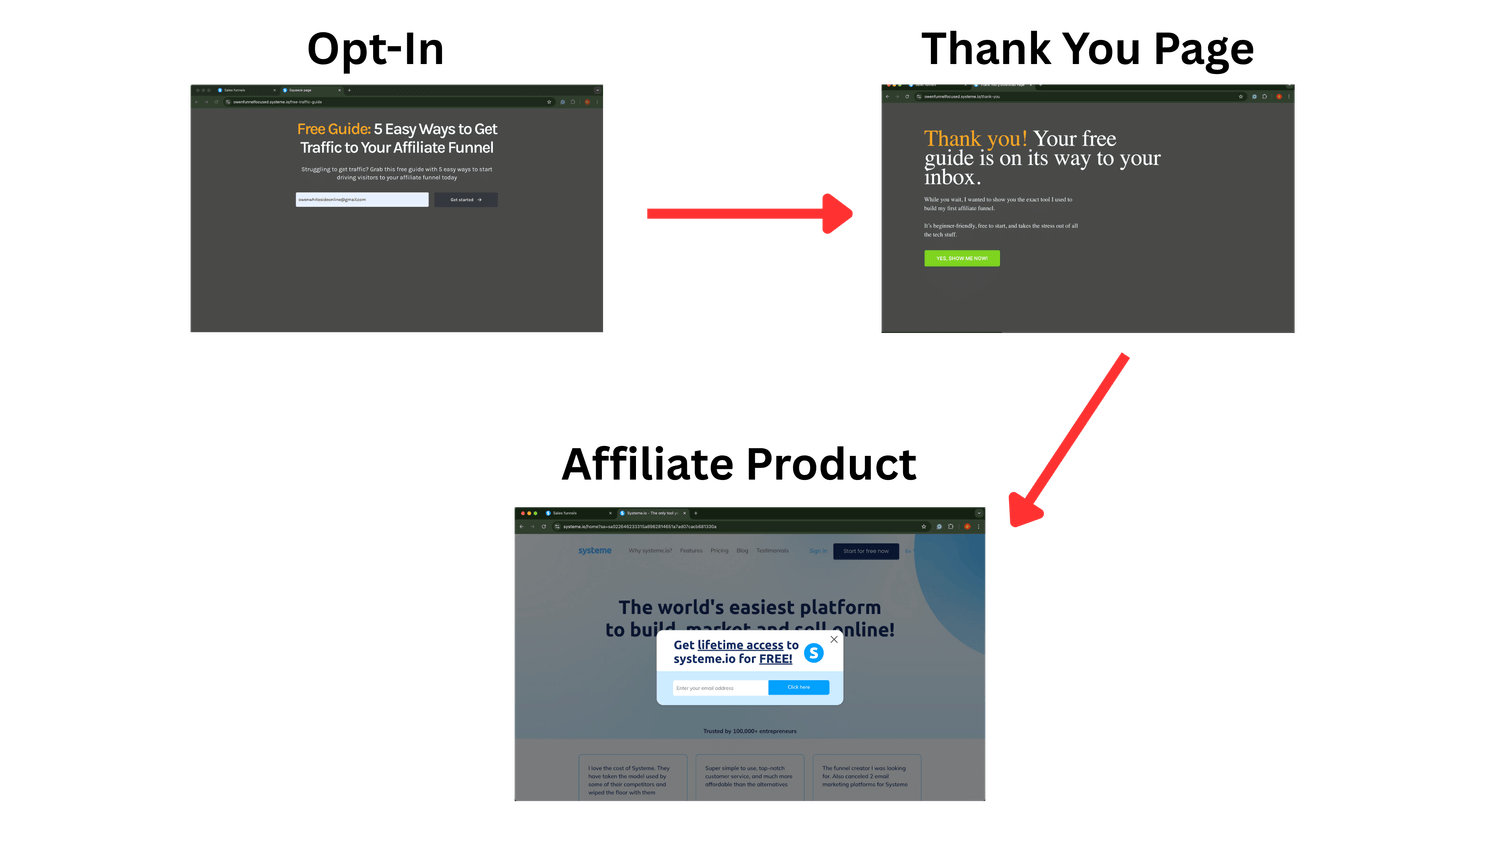
Here’s what your first funnel should look like:
Opt-in Page → Thank You Page → Affiliate Offer
And that’s all there is to it, really. There is absolutely no need to add any of the fancy stuff at this stage. No upsells, no fancy automations, no membership areas. Just a clear, simple path.
Let’s break it down:
- Opt-in Page: This is where your funnel journey kicks off. You offer something helpful, like a checklist or guide, and in return, they hand over their email address.
- Thank You Page: After they sign up, this page thanks them and sets the next step. You can simply say, “Thanks for signing up; check your inbox,” or take it a step further and introduce your recommended affiliate product. For example: “While you're here, this is the tool I personally use to build all my funnels.”
- Affiliate Offer Page: This is the product or service you’re promoting. You link to it using your affiliate link, and if they buy, boom! you earn a commission.
Keep this simple so you can launch fast and tweak things as you go. You can always get more advanced later… if you want to.
Tools You’ll Need to Build It
You don’t need to use loads of software or expensive online business tools.
Here’s what I recommend:
- Systeme.io – This is the funnel builder I use and recommend. If you’re wondering why I picked it, you can check out my full post here. It’s free, simple, has email marketing built in, and saves you from juggling five different tools just to get started. It’s one of the best all-in-one funnel software options for beginners.
- A Lead Magnet – A freebie you can offer in exchange for someone’s email. It could be a checklist, PDF, or simple guide. Be sure to have this ready.
- An Affiliate Offer – Something valuable that solves a problem your audience has. If you don’t have one yet, consider joining a free affiliate program like Amazon, ClickBank, or Systeme.io itself.
How to Build Your Affiliate Funnel in Systeme.io
Here, I've put together the exact steps you need to create your funnel, broken down step-by-step.
Each step includes an image, with red arrows and numbers indicating the order in which you need to click.
I’ve made sure to keep it as simple as possible, so let’s dive in!
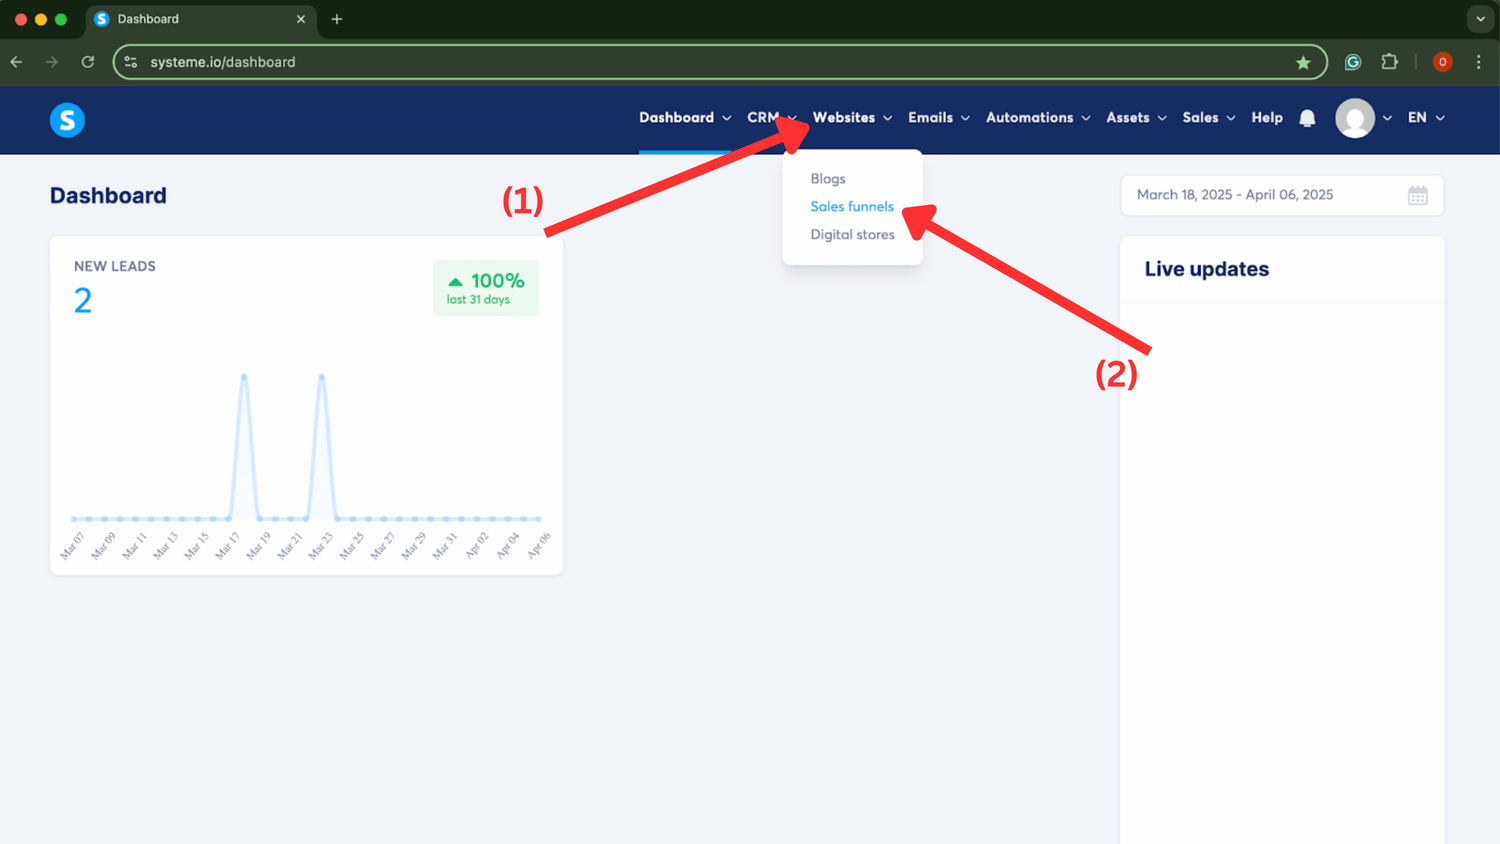
1. Create a New Funnel
Log in to Systeme.io, hover over 'Websites' at the top, and then click 'Sales Funnels' from the drop-down menu.
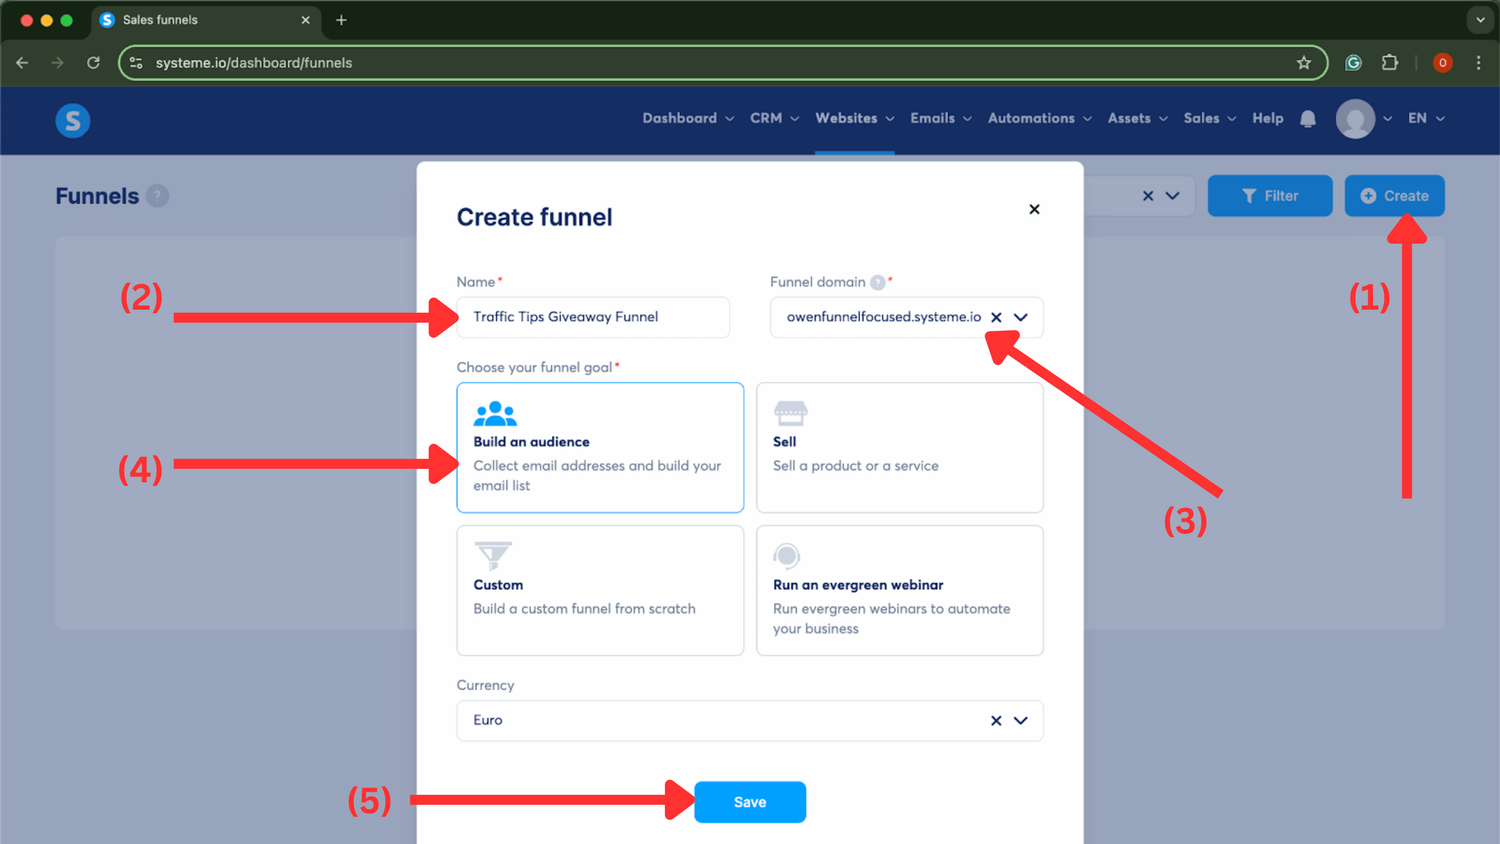
Once you land on the funnels dashboard, click the blue ‘Create’ button. Give your funnel a name, choose the domain you want to use (I recommend using a custom domain), select ‘Build an audience,’ and then click ‘Save.’
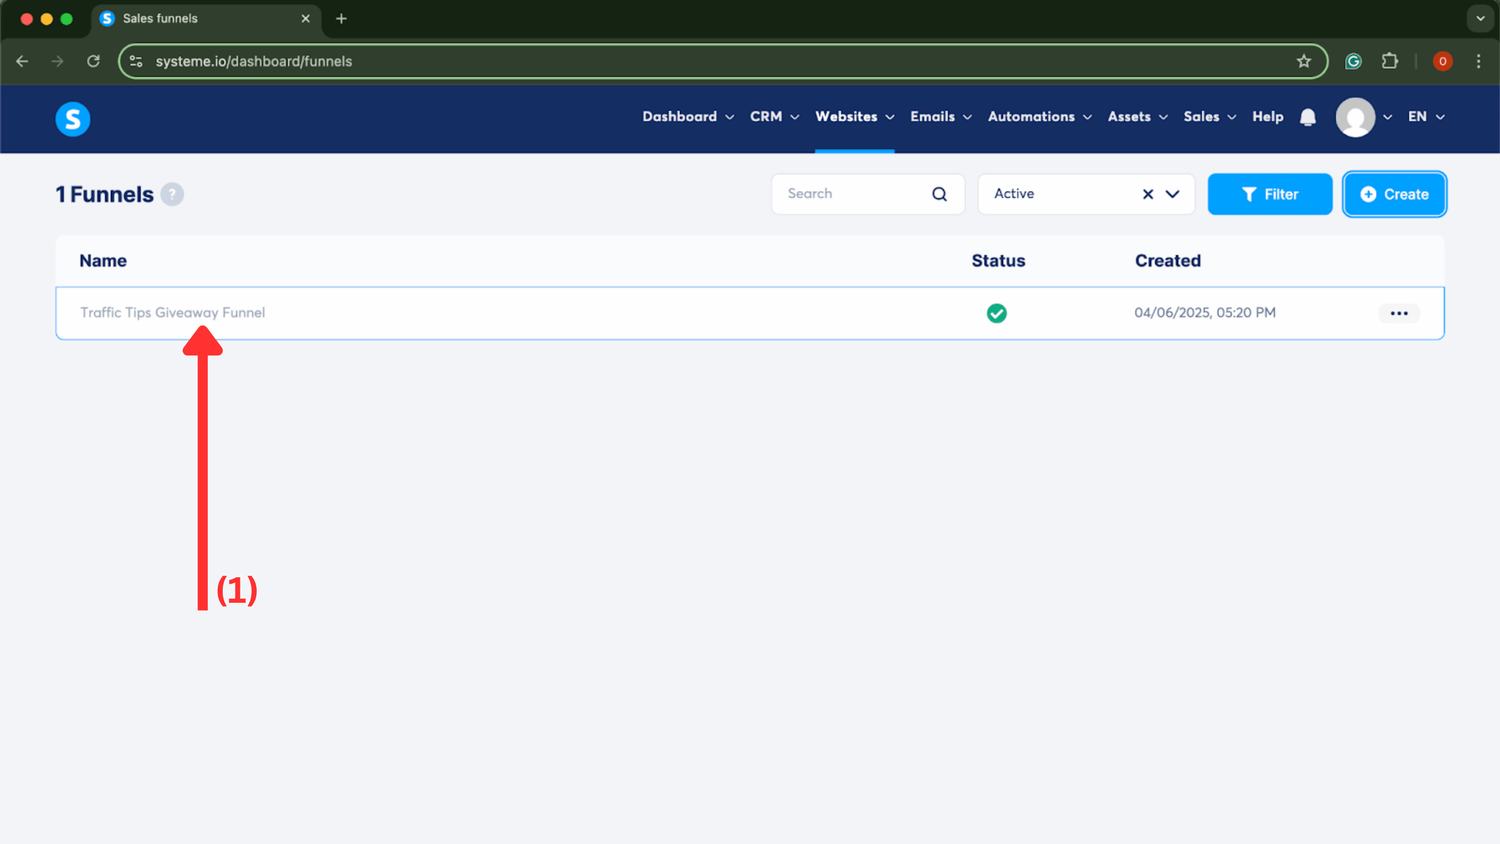
After you click 'Save,' you'll be taken back to the funnel dashboard, where your newly created funnel will appear. Go ahead and click on it, and let's move on to building the Opt-In Page.
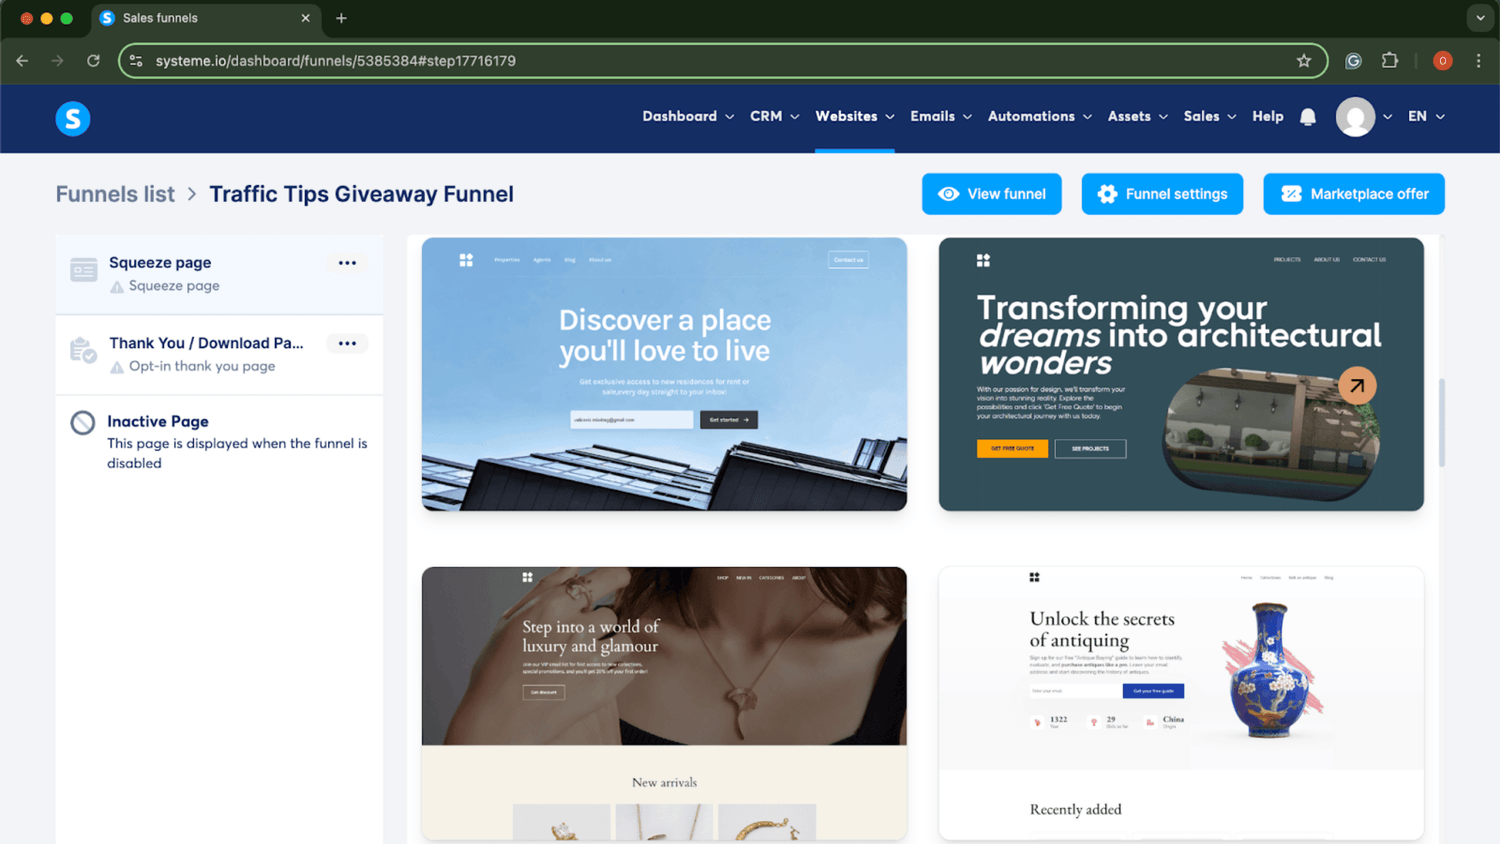
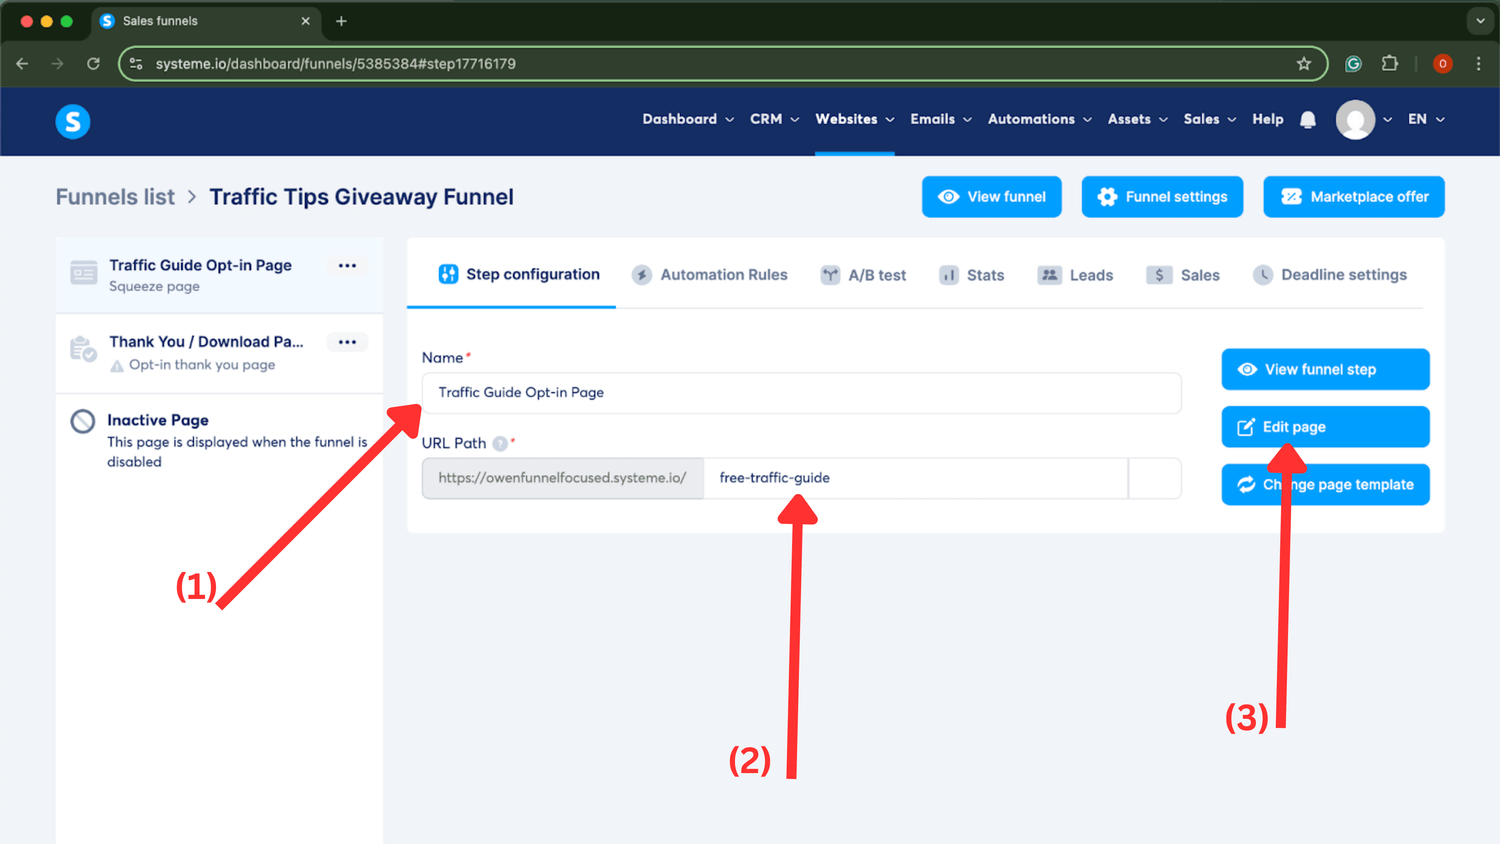
2. Build the Opt-In Page
Next, you'll be taken to the 'Squeeze Page' (Opt-In), where you can choose from a range of templates.
While you can start from scratch, I recommend picking a template since they look great and will save you time. Just pick one that you like and move on. Remember, the simpler, the better!
Once you've picked your template, name your opt-in page and set a URL path. After that, click 'Edit Page' so we can start customizing it!
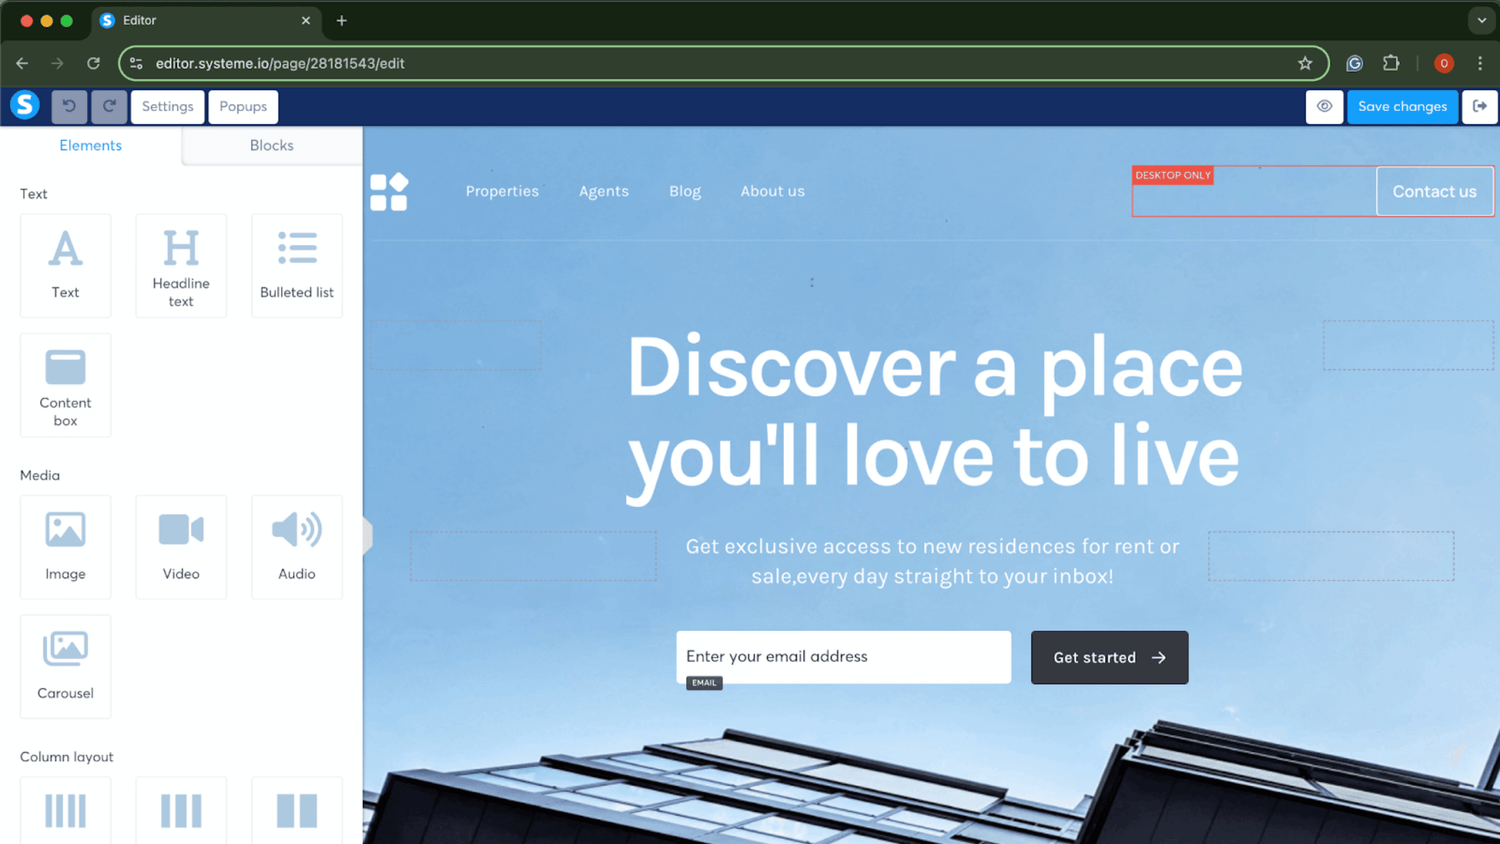
Below is the default page we’re starting with, and yours will probably look similar. As you can see, it’s packed with a lot of extra stuff we don’t really need. And remember, we’re aiming for simple.
Take a few minutes to explore the editor and get comfortable. In the next step, I’ll show you an example of how I cleaned this up and what mine looks like now.
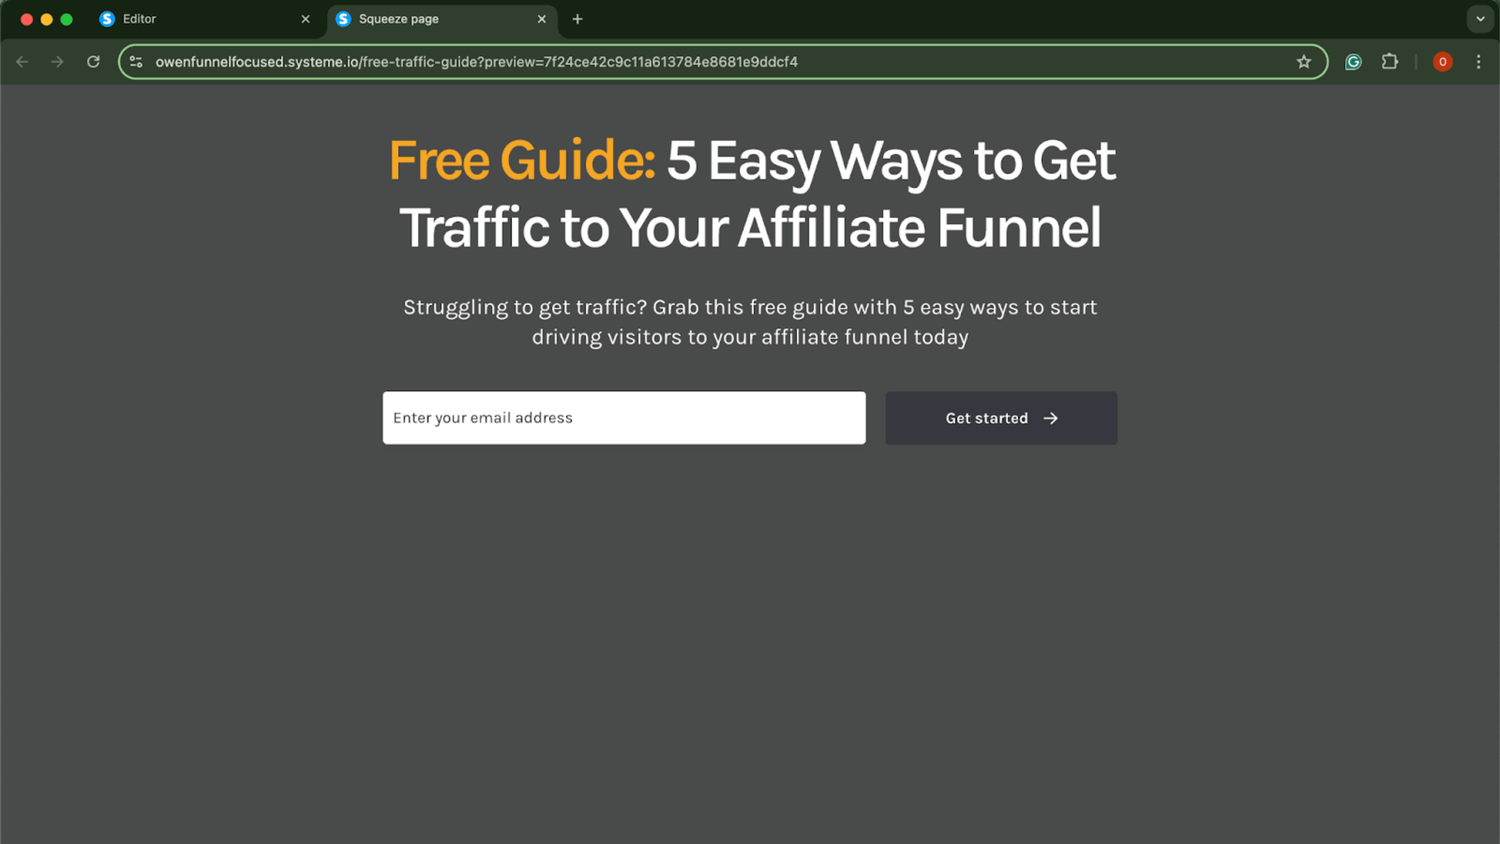
Ok, so here’s what I did: I deleted the header at the top, changed the background to a dark grey to help the text pop, and updated the title and subheading.
Now, it looks clean, simple, and focused, exactly what you want. After these steps, I’ll share a few more tips to improve your opt-in page since it’s arguably the most important part of your funnel.
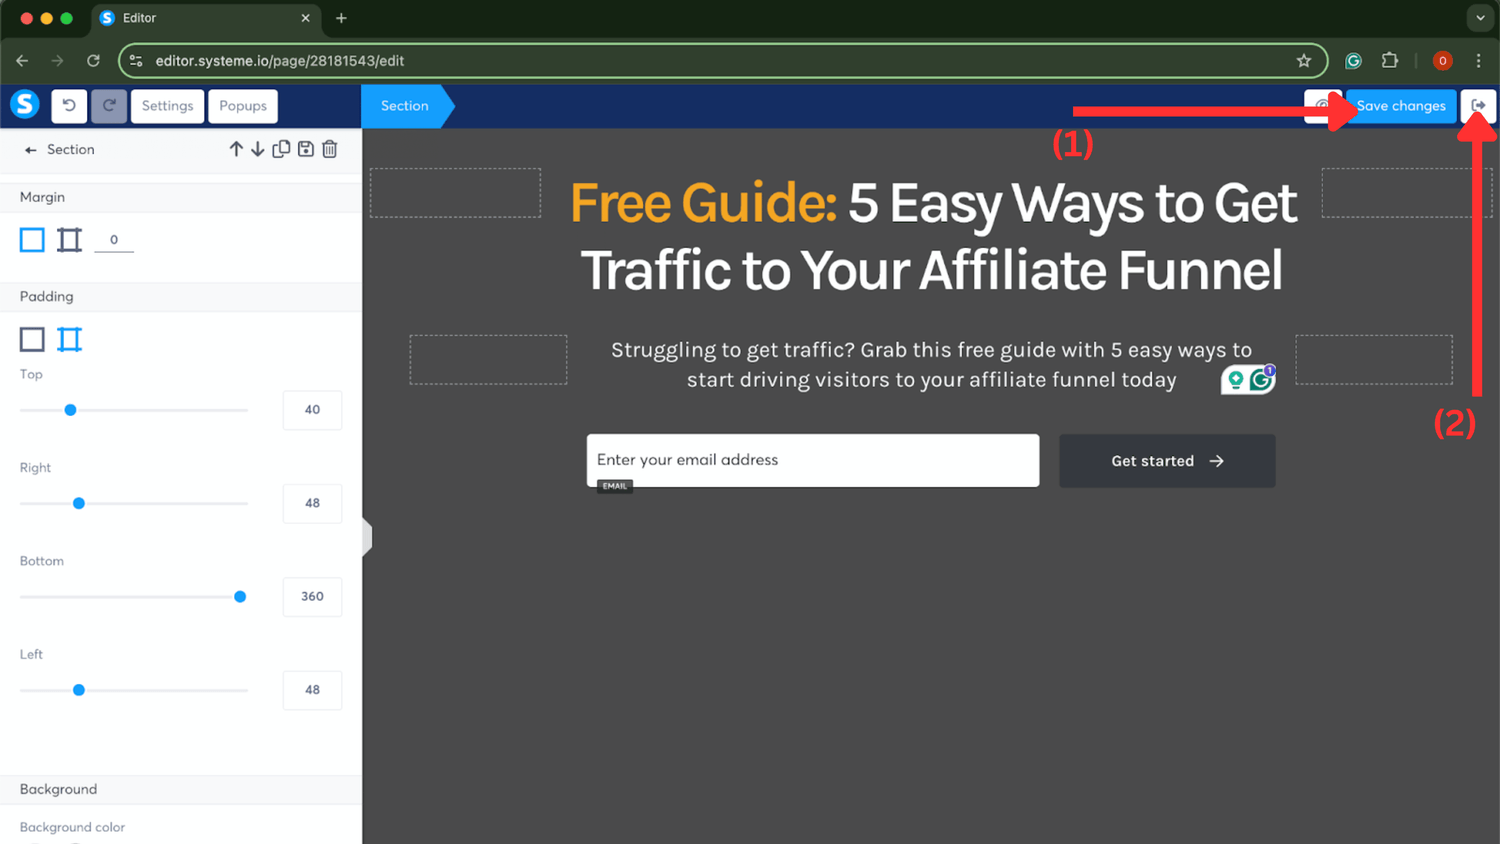
Now that you've edited your opt-in page, don’t forget to click 'Save Changes' and then exit.
3. Set Up th Thank You Page
Next, let’s move on to the thank you page. Click on that section of your funnel, and once again, you'll see a variety of templates. Choose one and proceed.
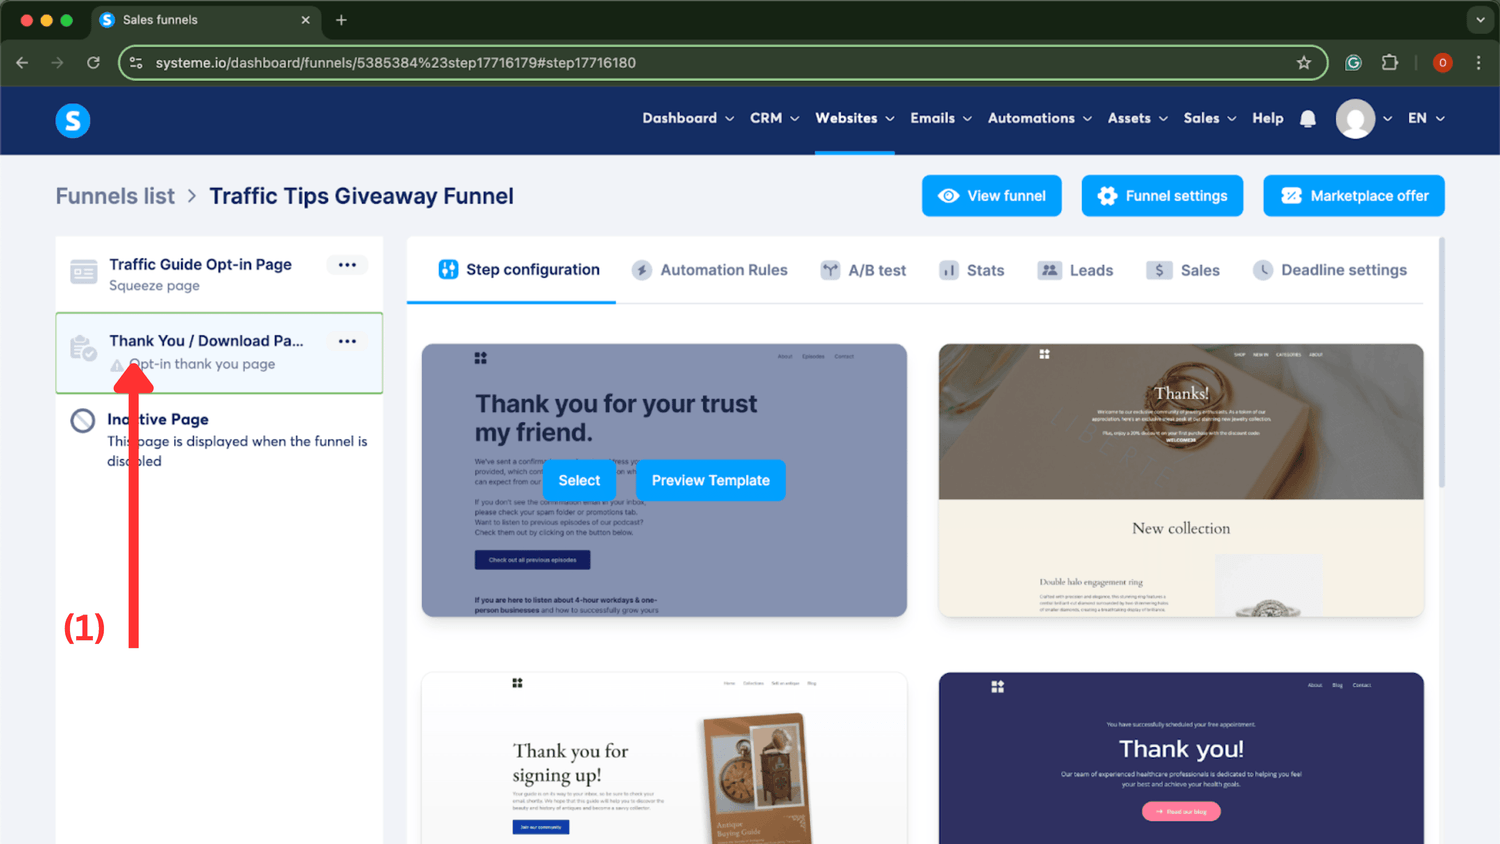
Just like before, name the page, set a URL path, and click 'Edit Page' to get started.
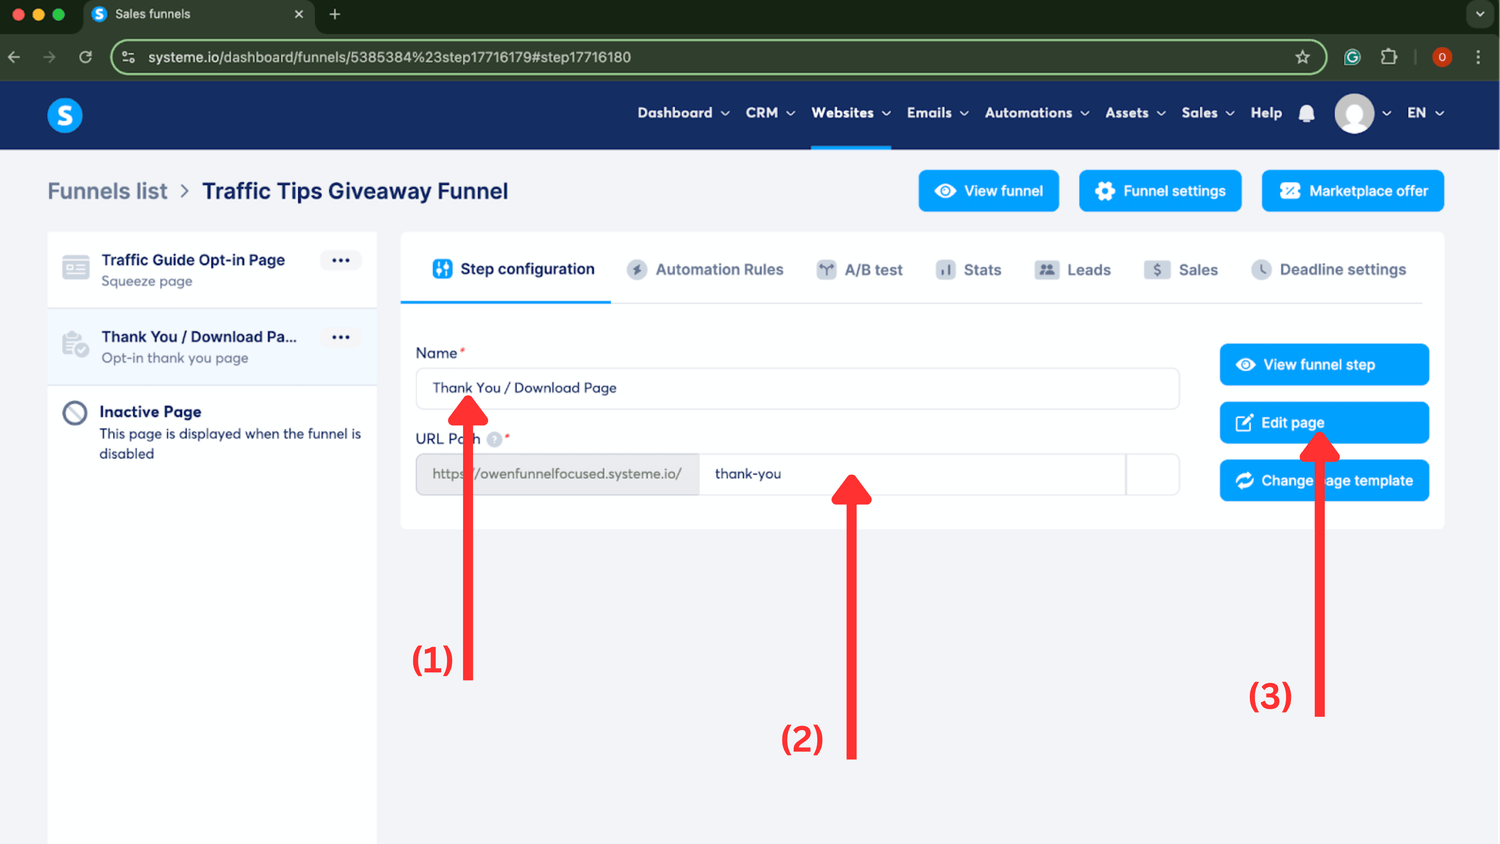
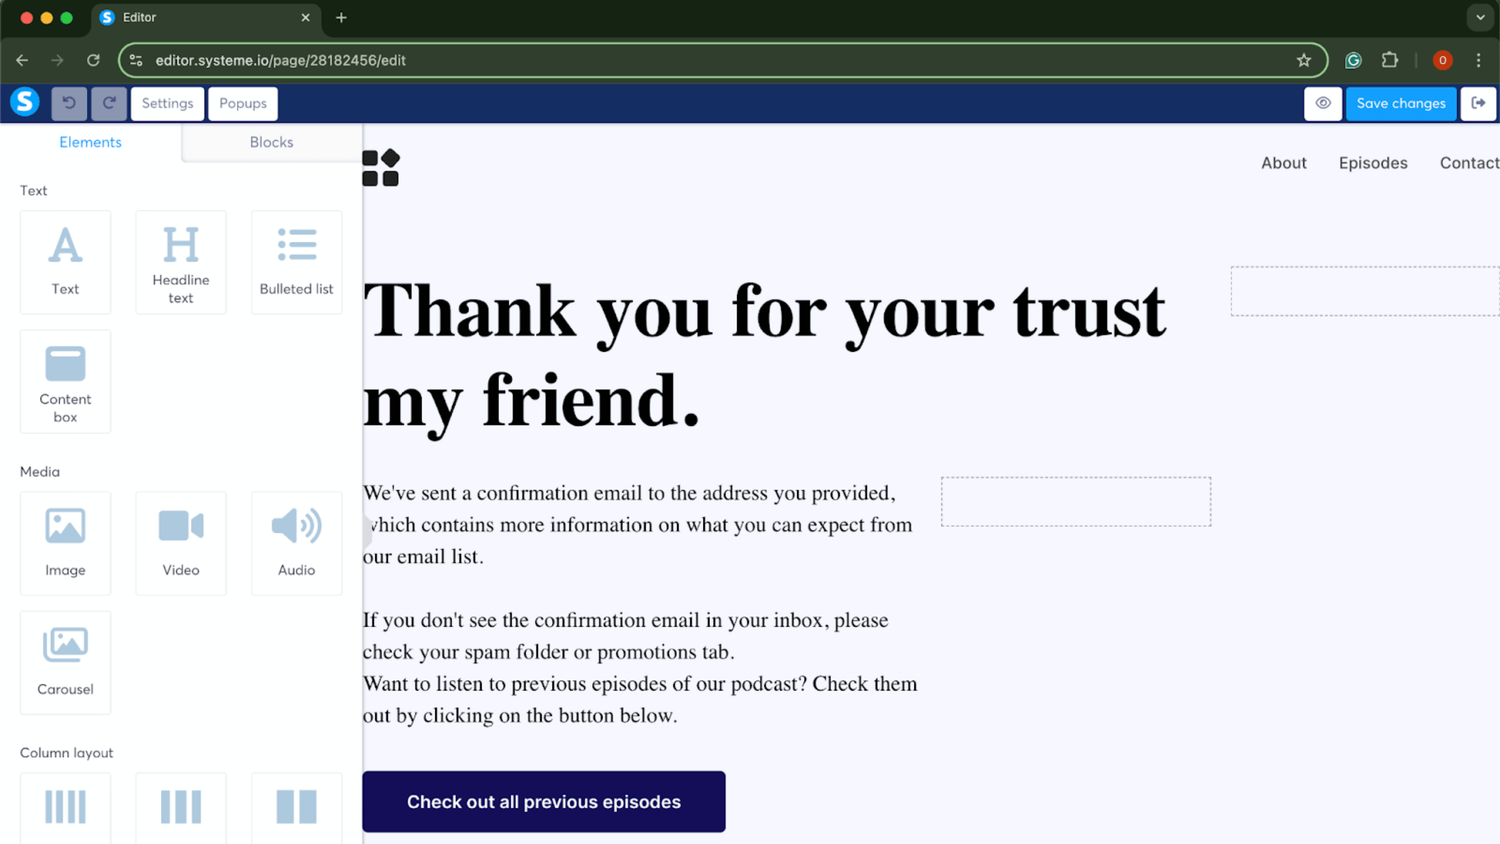
As you can see, this page needs a few adjustments. First, we’ll delete the header and tweak the design to match your opt-in page, keeping everything consistent. This page will also guide your lead to check their email for access to the freebie. Don’t worry, we’ll go over how to set that up shortly.
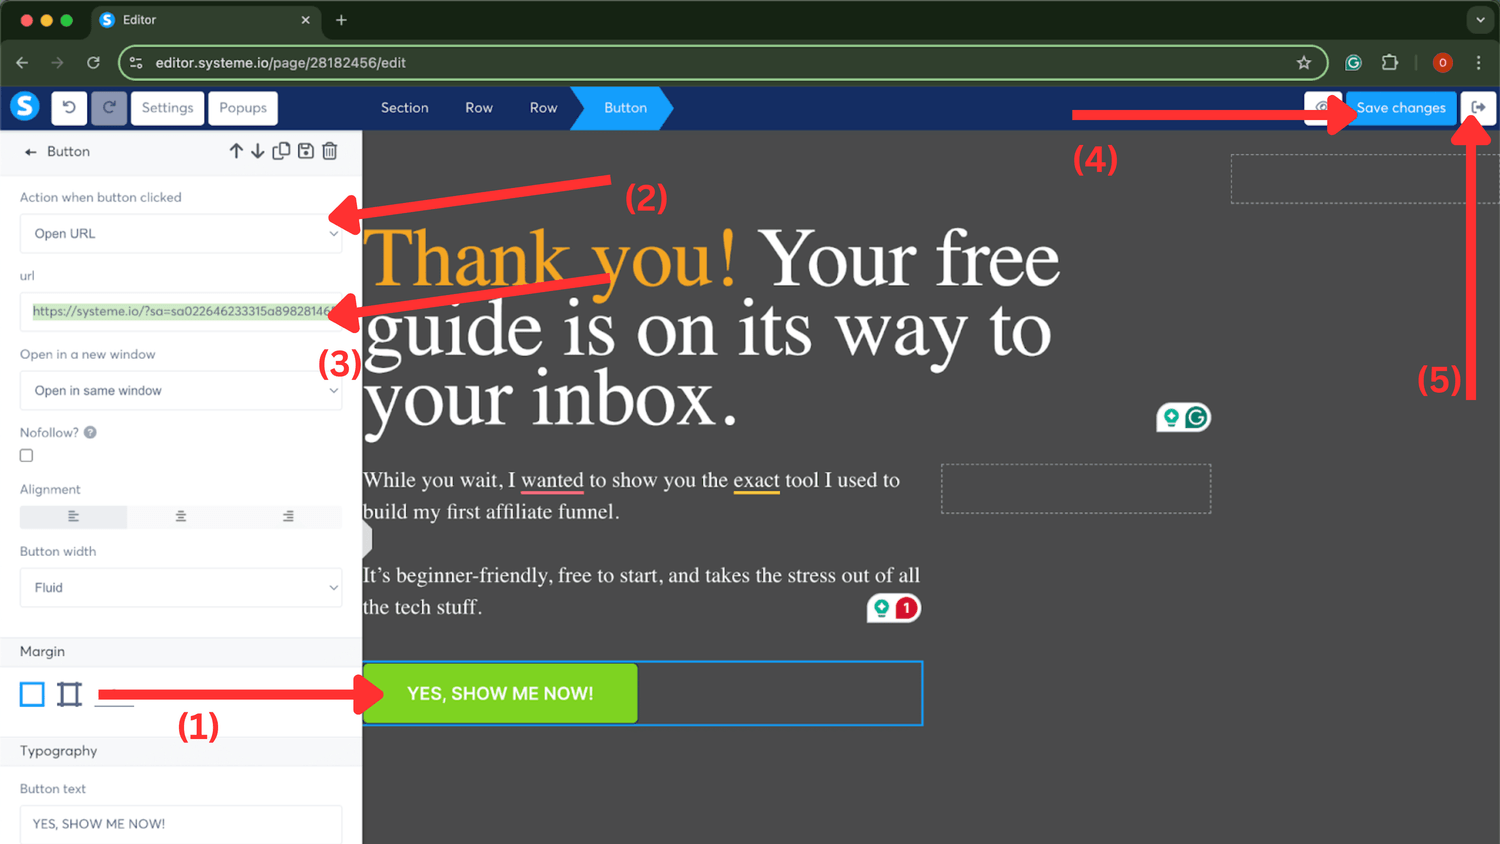
Here’s what I came up with. You’ll notice that I kept the design consistent with the opt-in page, and I also added a button. That button is where you’ll link to your affiliate product. So make sure you grab your affiliate link, and in the next step, I’ll show you exactly how to add it.
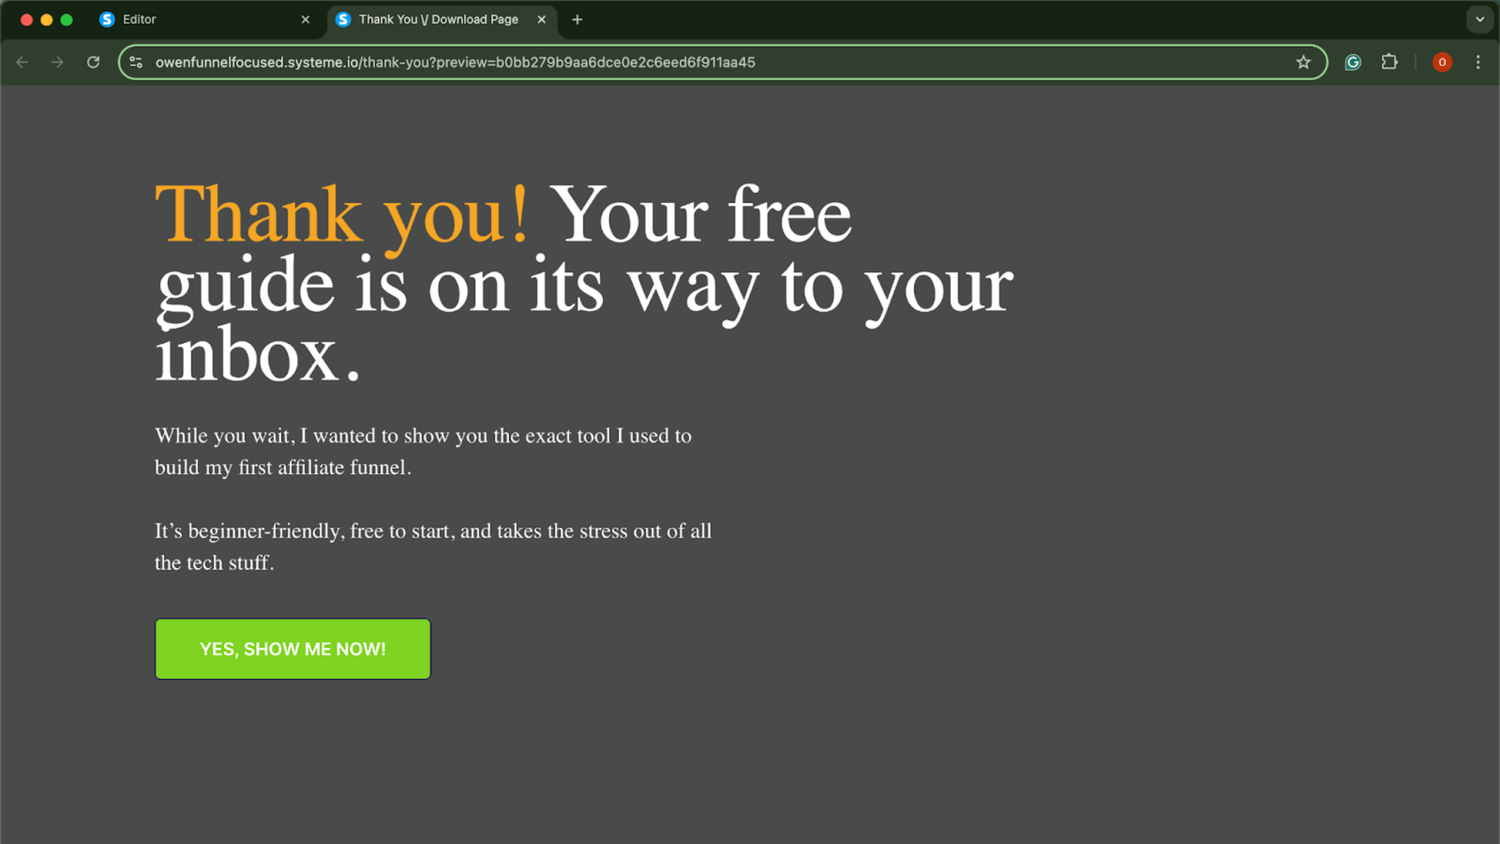
Back in the editor, you can use my text as a starting point. After thanking them and letting them know their lead magnet is on the way, introduce your affiliate product.
To add your affiliate link, click on the button to open the settings on the left. Under 'Action when button clicked,' select 'Open URL' and paste your affiliate link in the field below. Once done, click 'Save Changes' and exit. That’s it!"
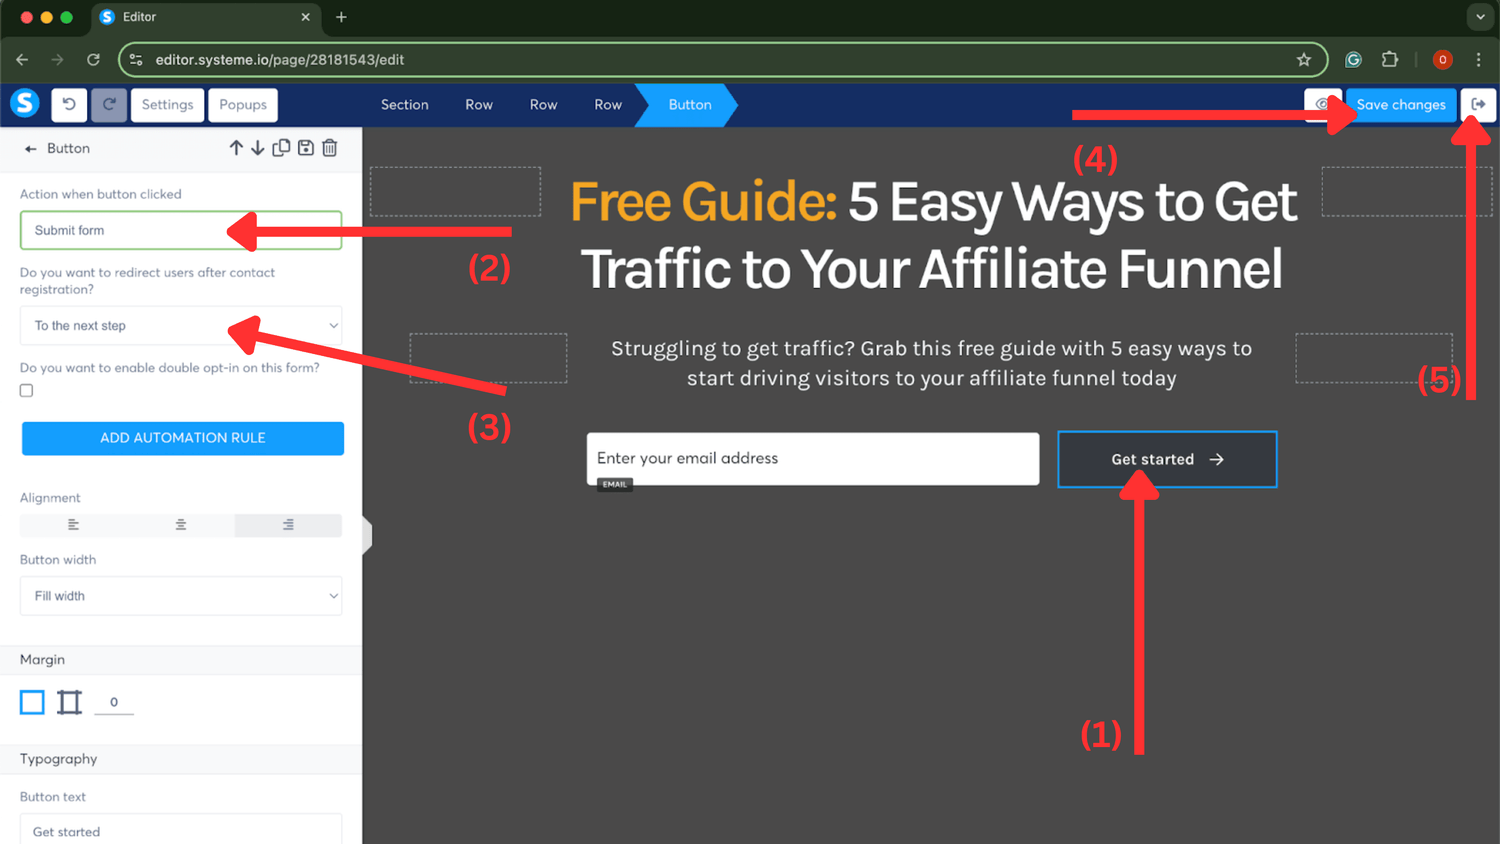
Now that the opt-in and thank you pages are set up, we need to connect them. This ensures that when someone enters their email on the opt-in page, they’re directed to the thank you page. Also, when they click the button on the thank you page, they’ll be taken to your affiliate product.
To connect the pages, go back to your opt-in page editor and click the button to open the settings on the left. In the 'Action when button clicked' section, make sure it's set to 'Submit form.' Then, underneath, click the dropdown and select 'To the next step,' which will make sure it directs users to your thank you page.
Once you’ve done that, click 'Save Changes' and exit. Your pages are now connected, and it’s time to test!
4. Connect Pages and Test
Now, let’s test to make sure the pages are connected. In your opt-in page settings, click the 'Copy URL' button, then paste it into a new tab.
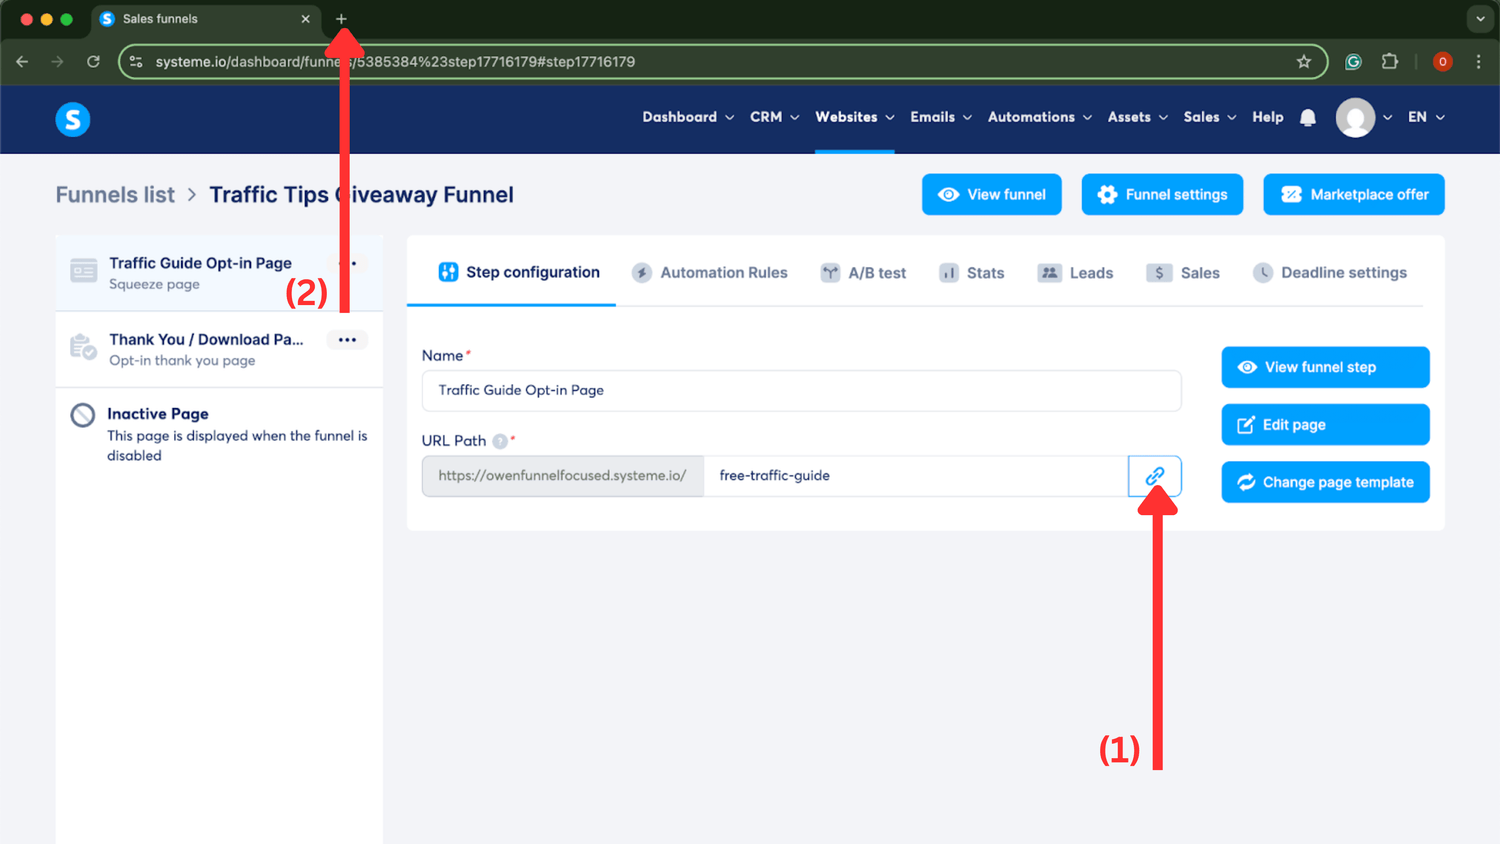
Once the page opens, go through the funnel: submit your email and click the button on the thank you page. If everything works, you're all set to move on. If not, review the previous steps to make sure nothing was missed.
Here is the process:
If you have made it this far, CONGRATS! I love seeing people take action. Now, it’s time to add a bit of email marketing to the mix, so when someone opts in, they’ll actually receive your lead magnet.
5. Hook Up Some Email Automation
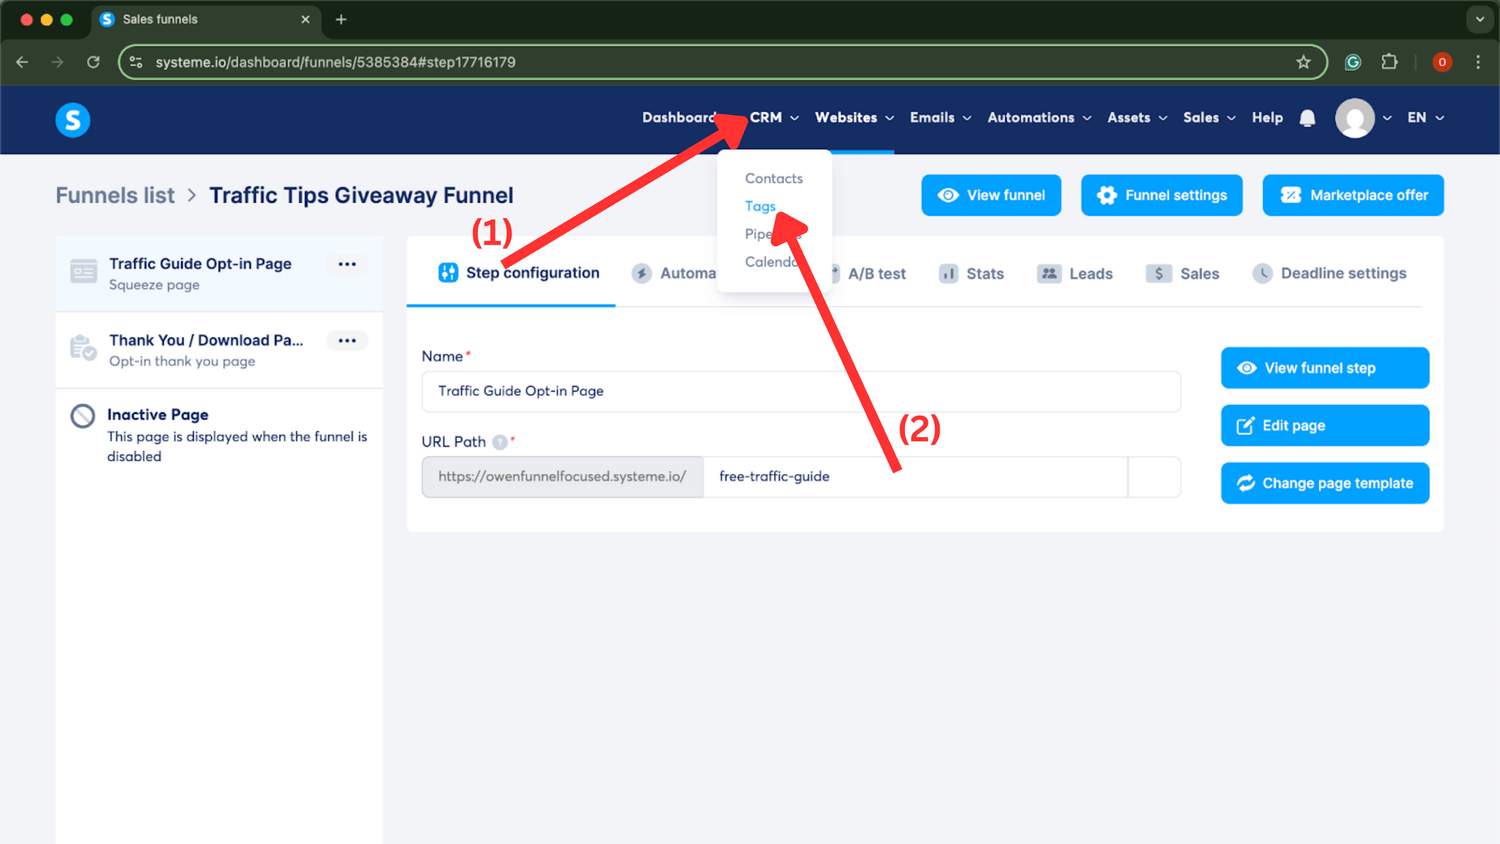
First, hover over the 'CRM' section and click 'Tags' from the dropdown menu. If you're not familiar, Tags in Systeme.io are essentially email lists. When someone opts into your funnel, they'll be tagged, so you know where they came from.
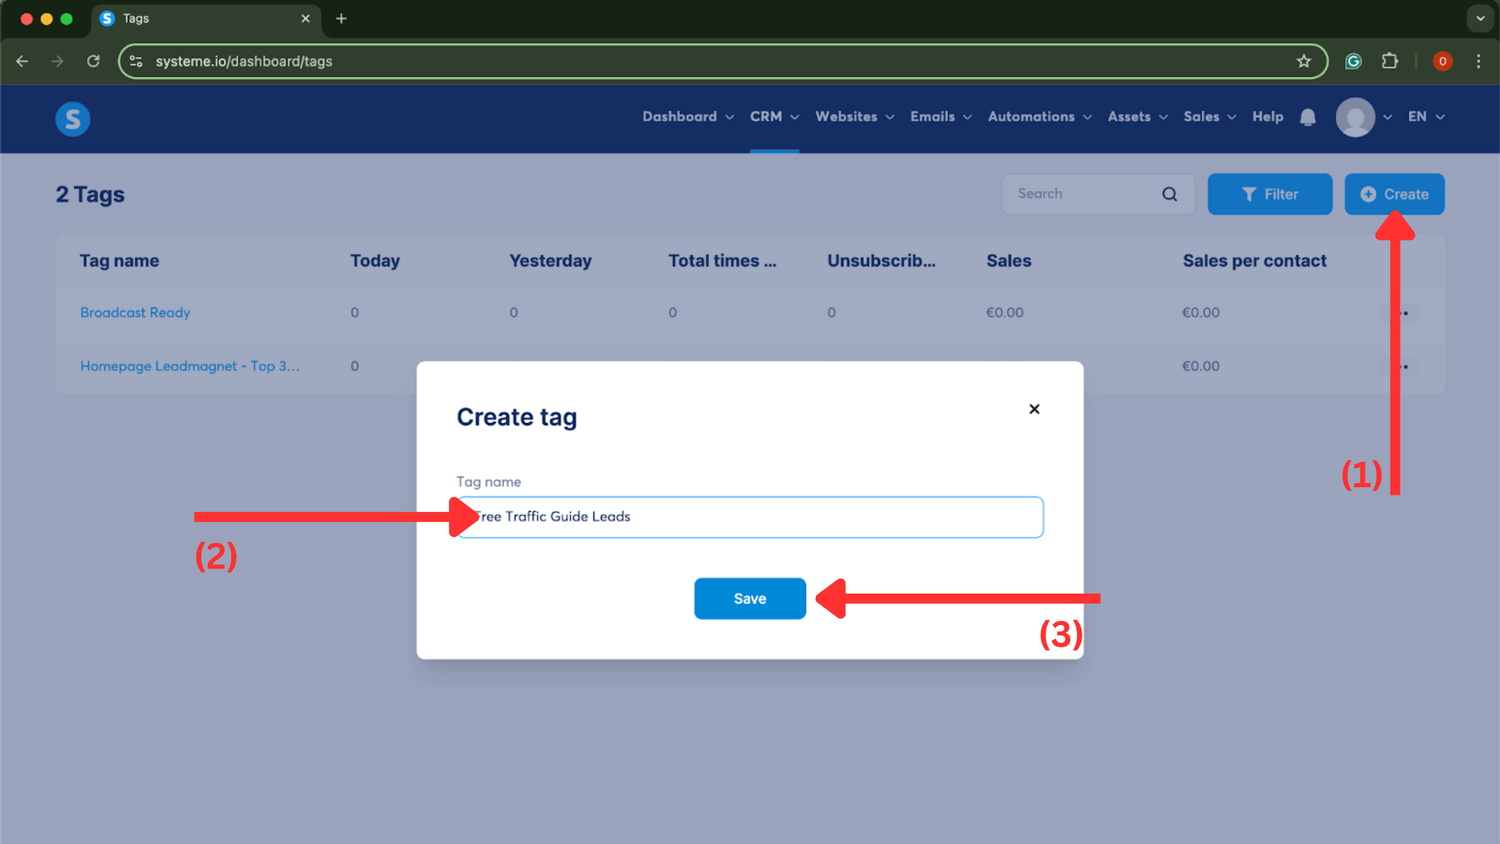
Next, click 'Create' and give your tag a name. Choose a name that makes sense to you for easy reference. Once you're done, click 'Save. '
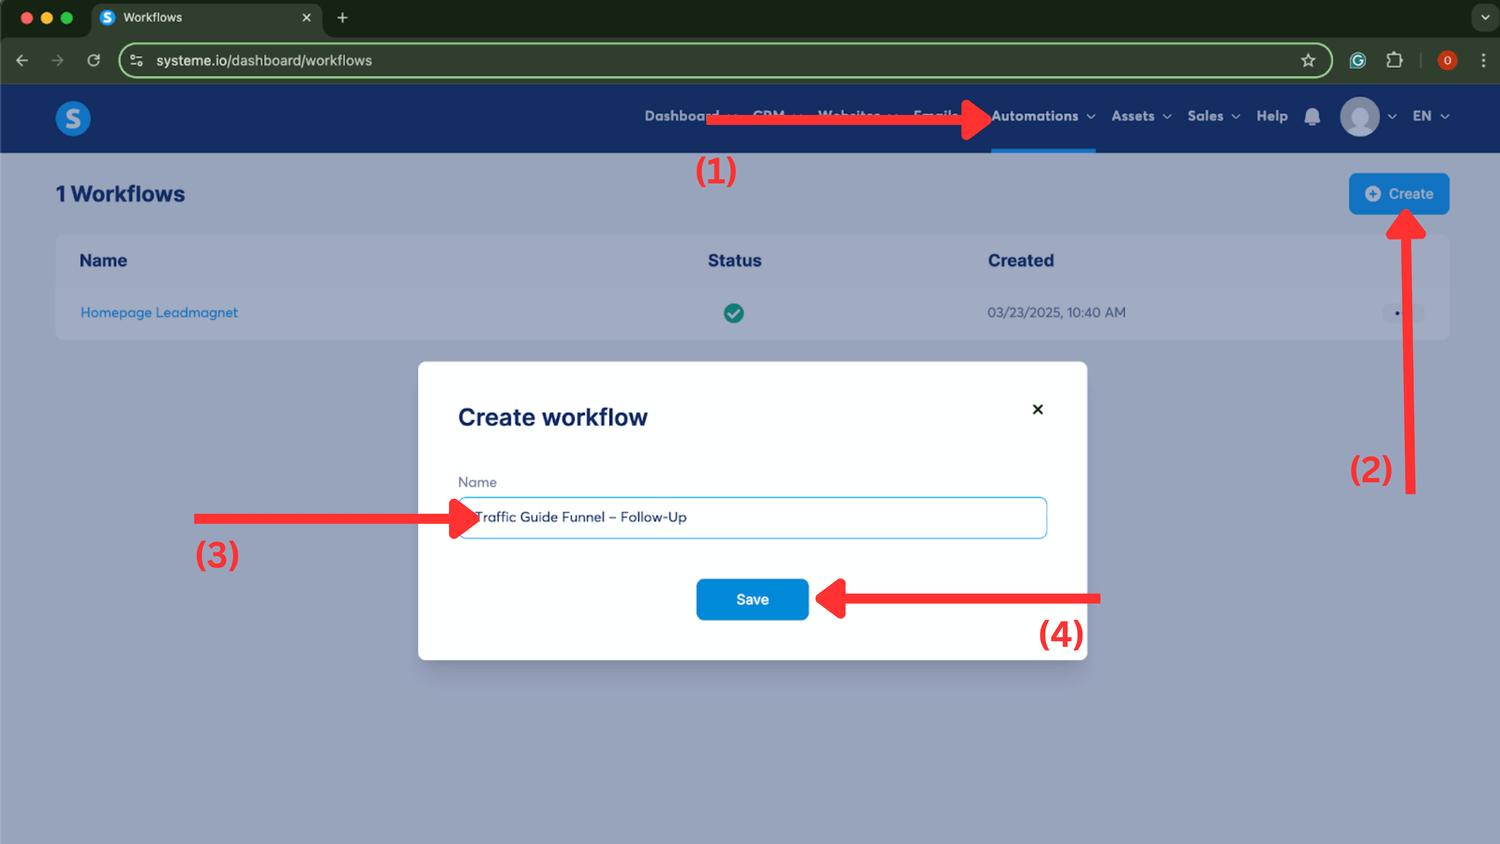
Great job! Now that you've created your tag, hover over 'Automations' at the top of the page and click on 'Workflows.' Then, click 'Create,' give your workflow a name, and hit 'Save.'
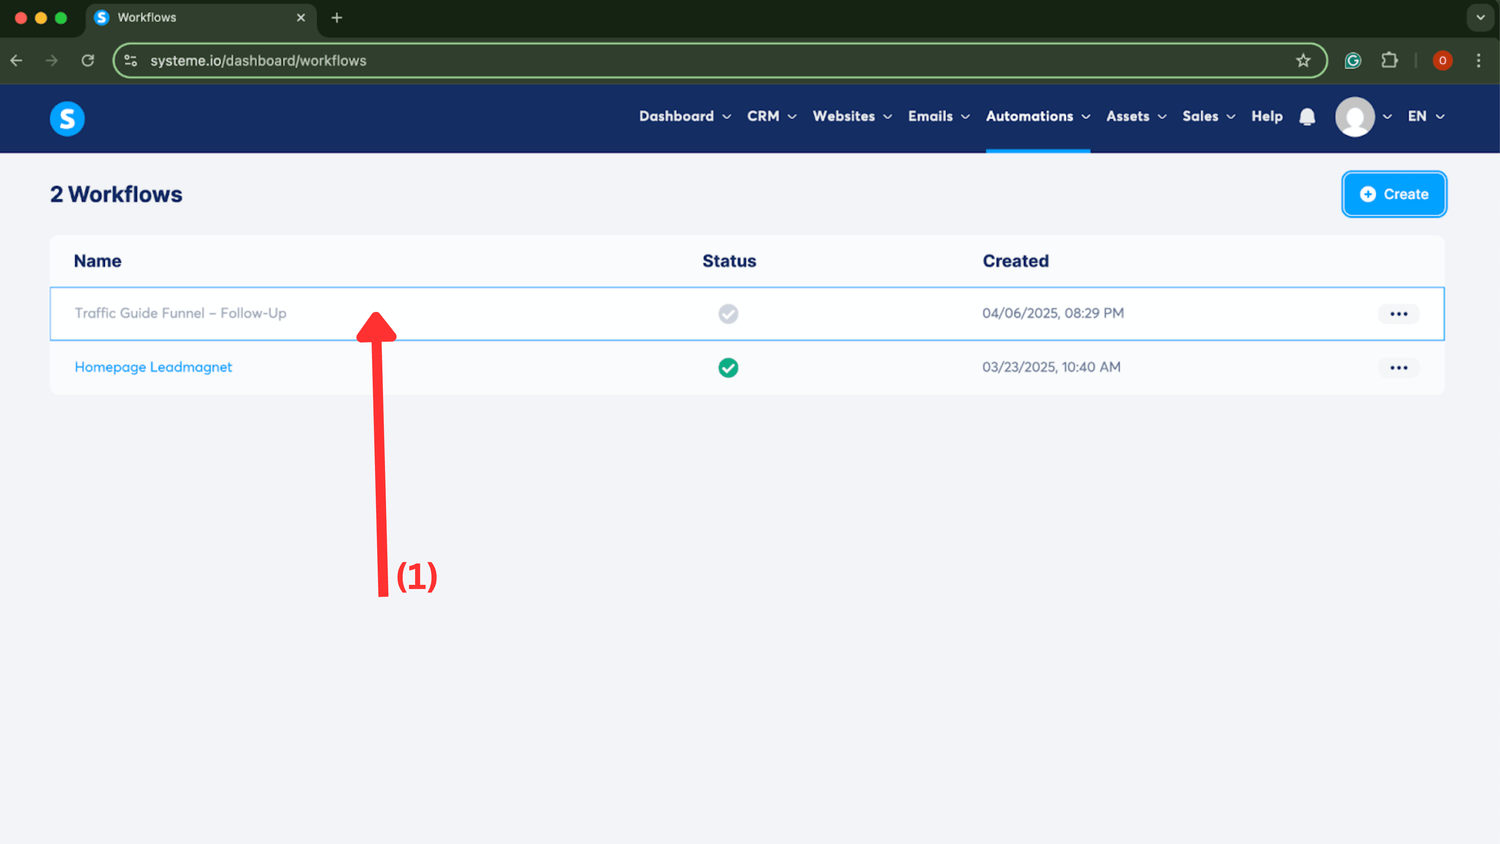
Then, just click into the workflow you just created.
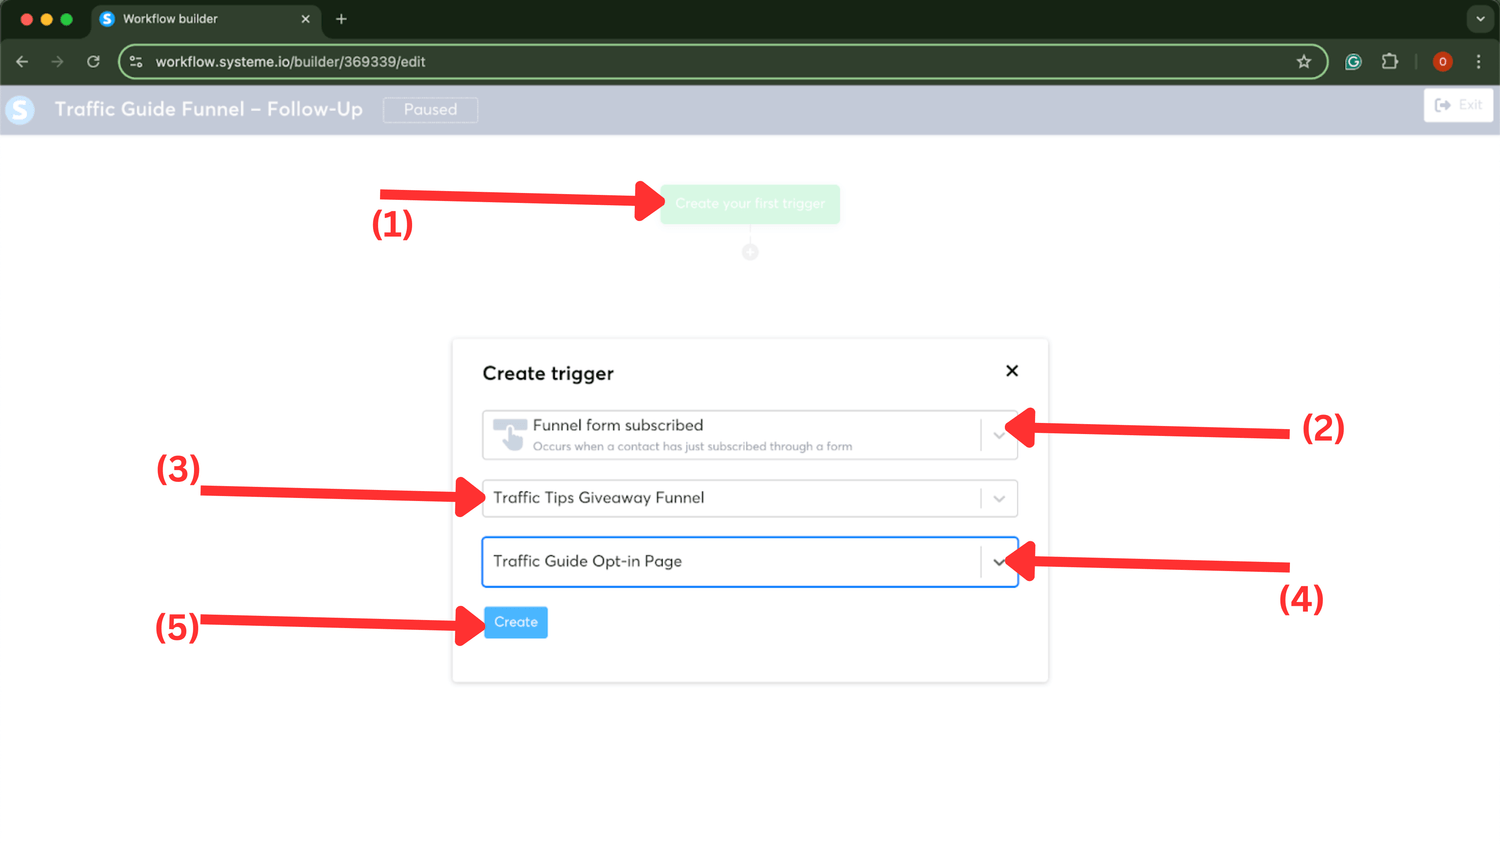
After you click into your workflow, you’ll see a green button that says 'Create your first trigger.' Click on that. When the box pops up, select 'Funnel form subscribed' from the dropdown menu. Then, choose your funnel in the next box, and select your opt-in page in the final box. This sets up the trigger to activate the workflow once someone opts into your funnel. Click 'Create' to confirm.
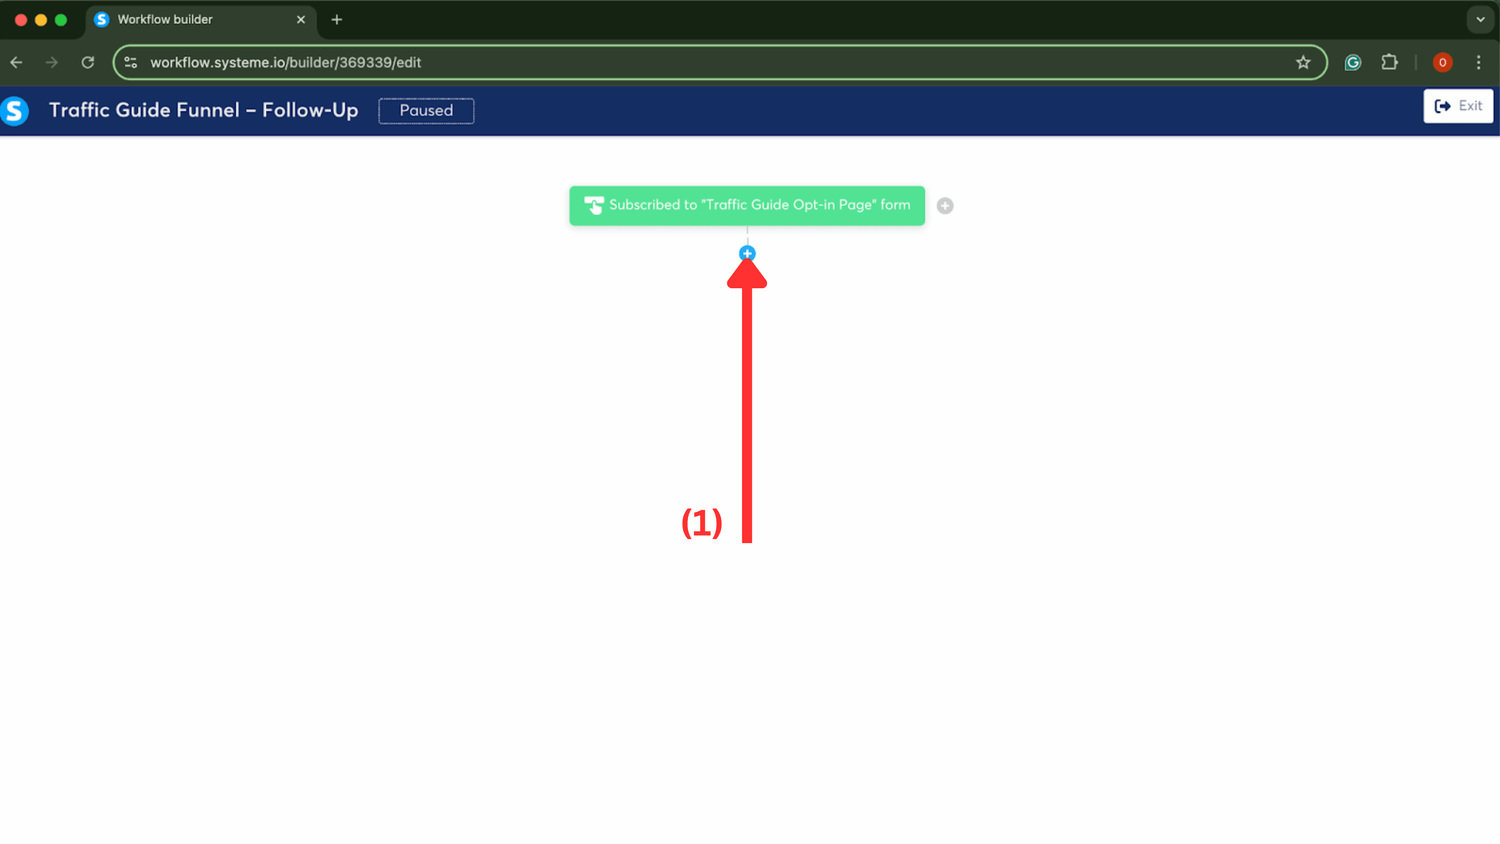
Then, once you have set the trigger, click on the cross underneath the trigger.
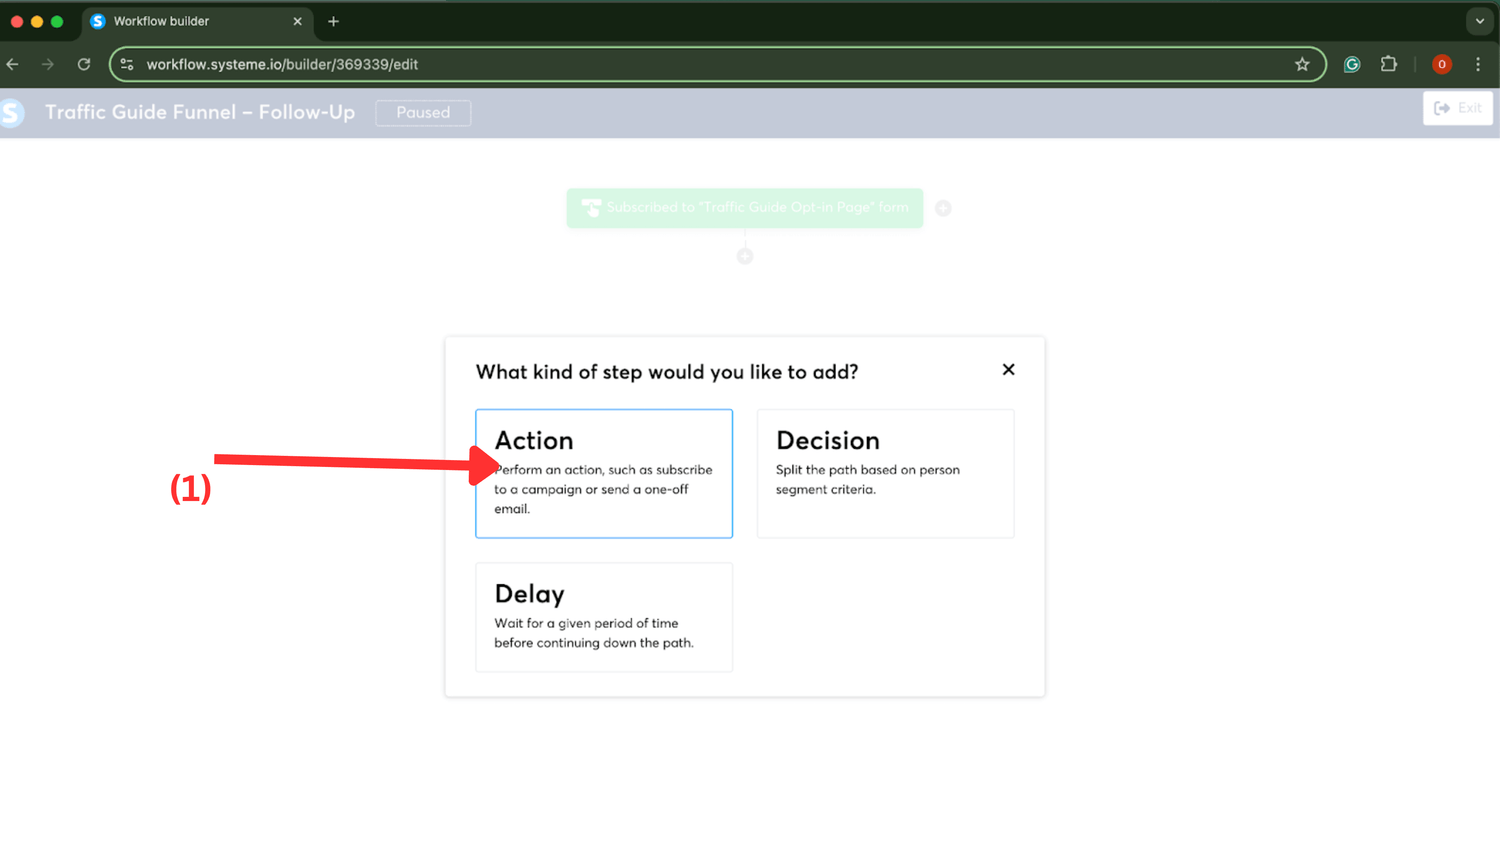
When the box pops up, we want to create an action, so click on “Action.”
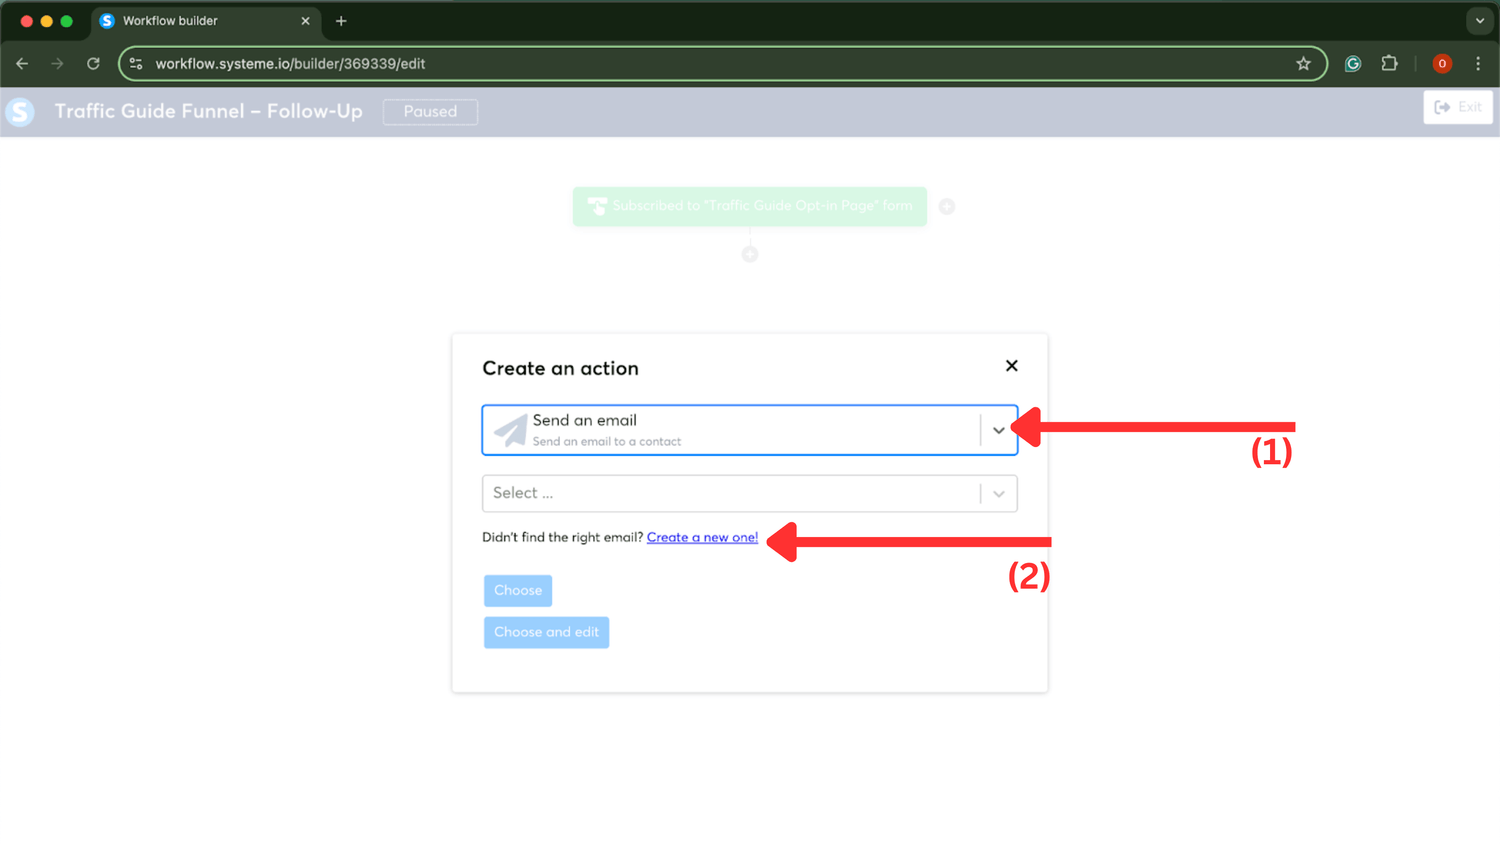
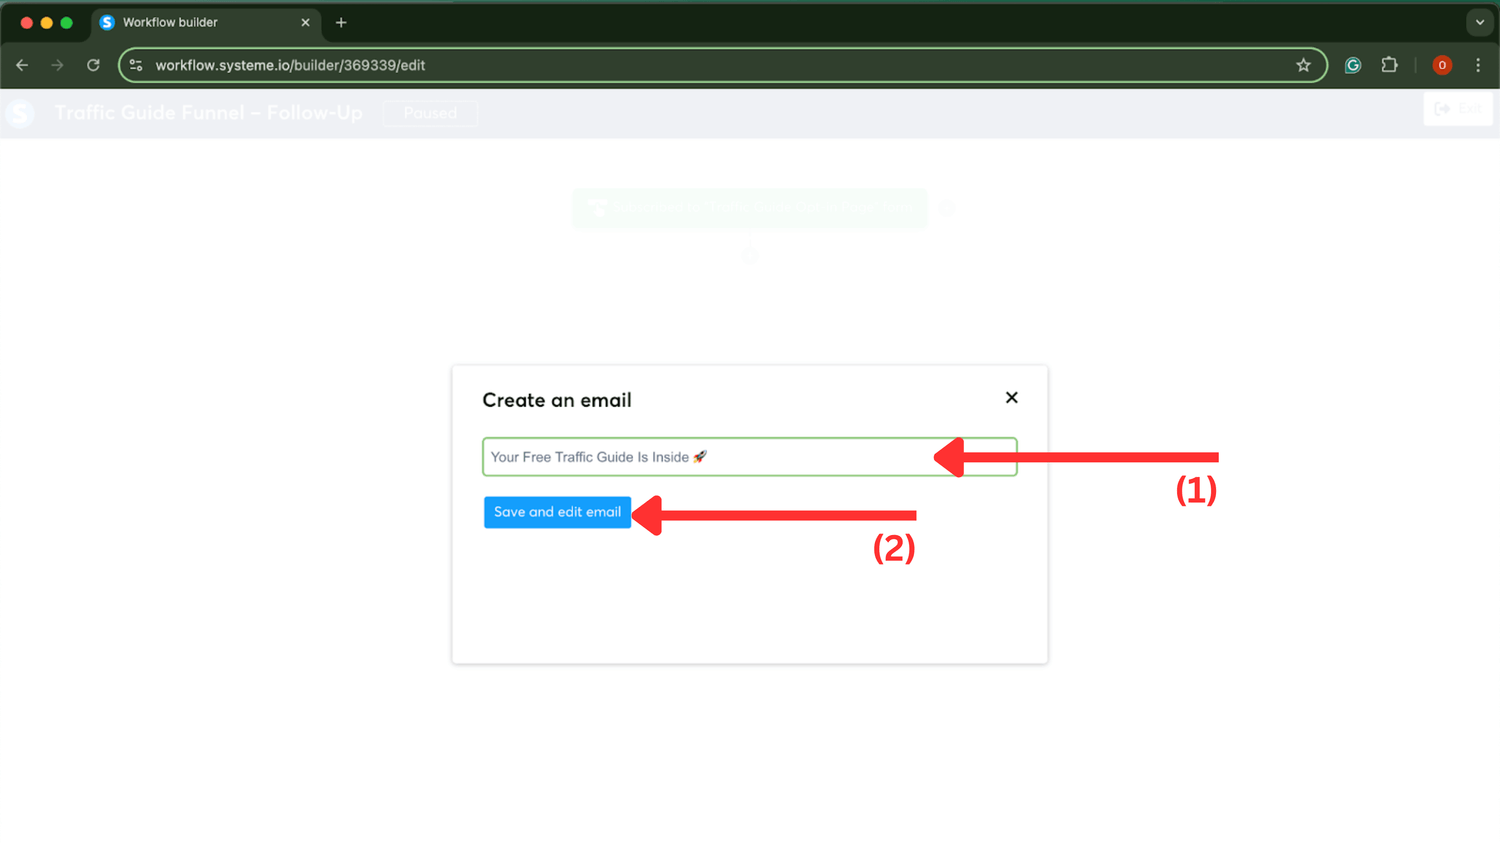
Next, click on the drop-down box to choose an action and select 'Send an email.' Since we don't have an email set up yet, go ahead and click 'Create a new one!'
This will bring you to the section where you can create the subject line for your email, the first line your recipients will see. You can make it whatever you like, but I recommend something like ‘Get Your [Lead Magnet] Inside.’ Feel free to add your own personal touch, like I did in the example below. Once done, click ‘Save and Edit Email.'
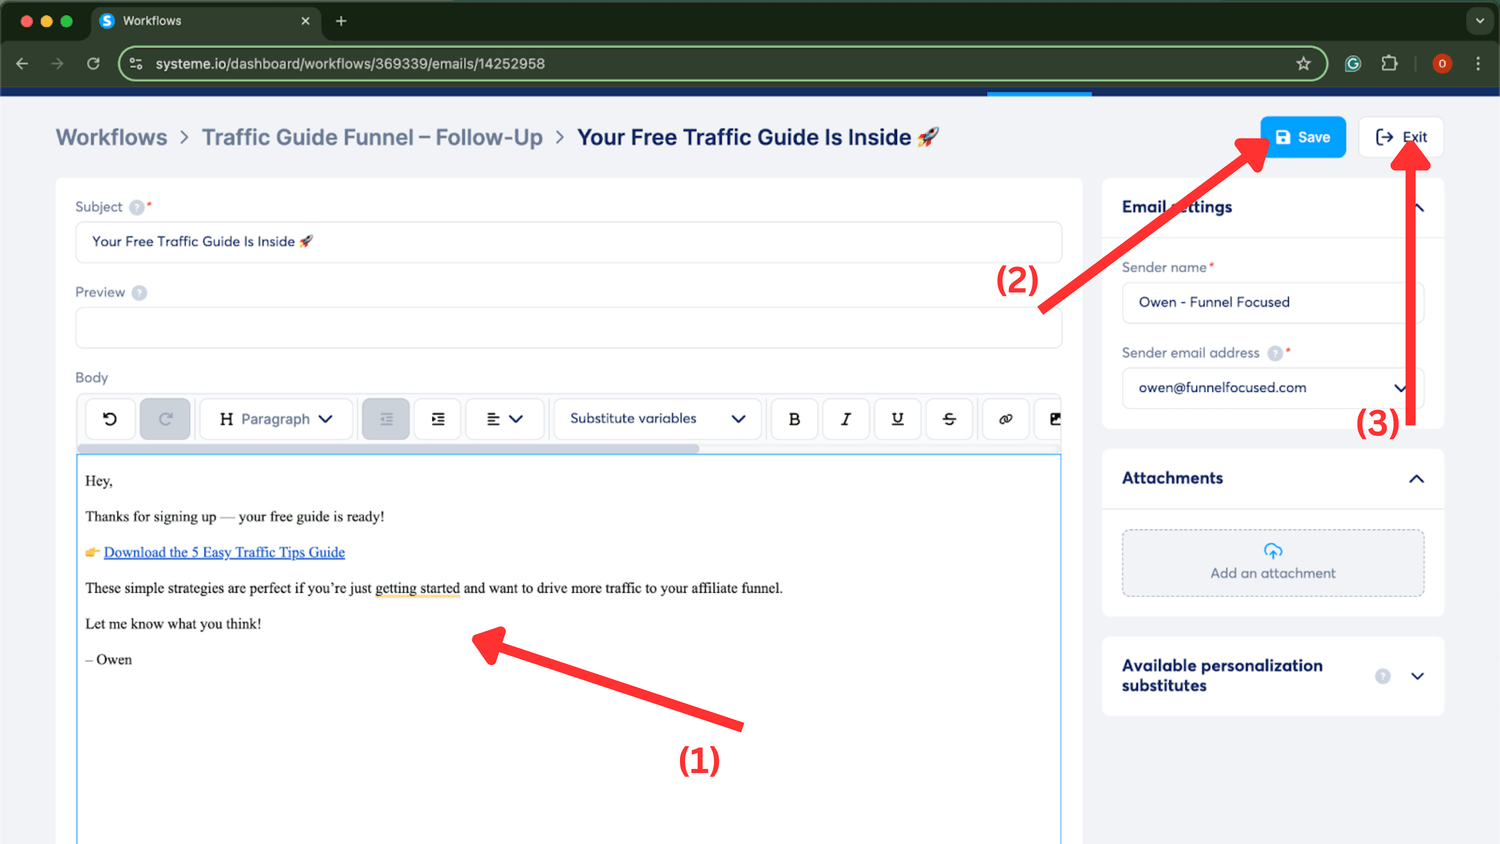
Now, as you can see below, we’re in the email editor. This is where you'll link your lead magnet.
Below, you'll see the email I used in my example, but here’s a template you can use. Just replace the text in brackets with what's relevant to you:
Subject: Your [freebie name] is here 🎉
Body:
Hey,
Thanks for signing up! Your free [checklist/guide/resource] is ready.
👉 [Insert download link or instructions]
Inside, you’ll learn [1–2 quick benefits or outcomes], so make sure to check it out today.
Let me know if you have any questions - I’ve got your back!
[Your Name]
Once you've written your email, go ahead and 'Save' and 'Exit'
You will then be taken back to your workflow. Just click Exit again.
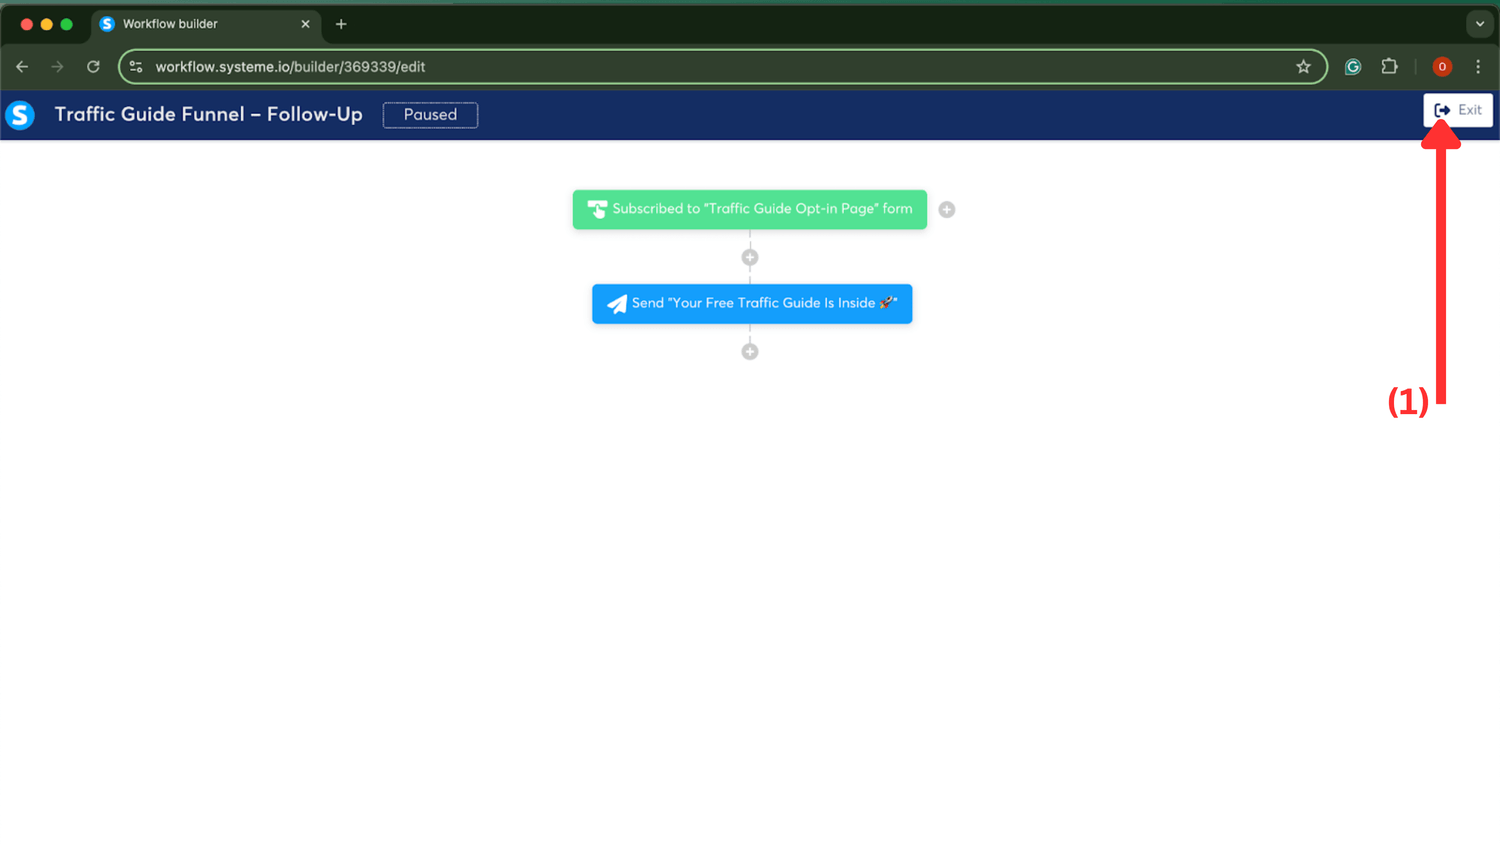
Now, hover over the three dots on your workflow and click 'Activate.'
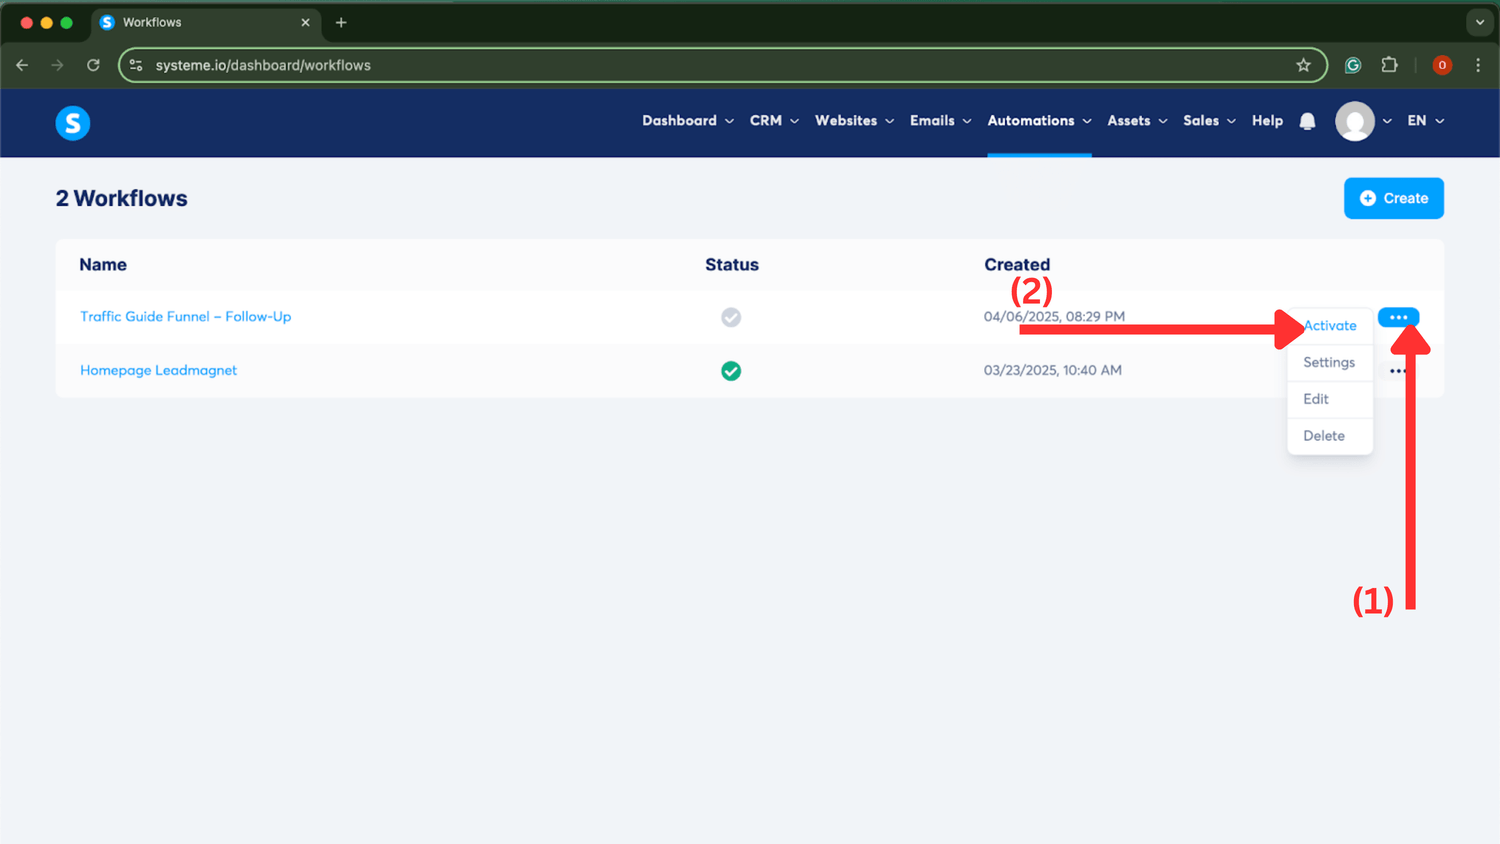
Guess what...
You now have a fully working affiliate funnel that's ready to start collecting leads! How cool is that? I recommend going through the entire funnel and testing it to make sure everything works as it should.
Here’s what it should look like:
If your funnel isn’t working properly, be sure to go back through the steps; you may have missed something along the way.
Tips for a Great Opt-In Page
💡 Did you know?
The median landing page conversion rate across industries is around 6.6%, but pages that are clean, clear, and focused tend to convert at a much higher rate. (Backlinko)
Your opt-in page is the first thing people see, and it sets the tone for everything that follows. If it falls flat, your funnel stalls.
Here's how to make it work:
- Focus on one clear benefit. Don’t try to do too much. Your headline should answer one simple question: “What will I get, and why should I care?”
- Make the offer irresistible. Whether it’s a checklist, mini guide, or free tool. It needs to feel valuable and quick to consume.
- Use short, punchy text. Avoid long paragraphs. Use bullet points or bold statements to quickly explain what they’re signing up for.
- Keep the design clean. Too many images, colors, or elements can distract. Stick to a clean layout that draws attention to the CTA (Call To Action)
- Use a strong CTA. “Get Instant Access” or “Download the Free Guide” works better than vague phrases like “Submit.”
- Show a visual of the lead magnet. Even a simple ebook mockup can boost conversions. People like to see what they’re getting.
- Build trust instantly. A small note like “No spam, ever” or “Only useful tips, no fluff” can lower hesitation.
The goal is to make it so obvious and easy that they think, “Why wouldn’t I sign up?”
Before You Publish: Quick Checklist
- Make sure your funnel works smoothly on both desktop and mobile.
- Test that your opt-in page flows cleanly to your thank you page.
- Confirm your lead magnet is linked properly and easy to download.
- Double-check that your affiliate link works and goes to the right place
- Read everything aloud to catch typos, weird phrasing, or anything broken.
Whoop Whoop! You Done It!
I'm so excited for you right now because this is your first step toward earning affiliate commissions. It’s not going to be perfect, and that’s okay. The goal is to launch, learn, and improve.
You’ve now got a basic affiliate funnel in place. Keep it simple, focus on helping your audience, and take action. If you’re a beginner affiliate marketer, there’s no better time to build momentum than right now.
👉 Return to the main guide to continue building your affiliate funnel.
© www.FunnelFocused.com - 2025